H2O helps law faculty make digital casebooks that are free, simple to update and easy to access and print.
All of the content on H2O is free to access and covered by a CC BY-NC-SA 3.0 license.
Account Set-up
Sign up
Anybody with an internet connection can read an H2O casebook - browse the collection here.
Anybody who wants to author, remix, or take notes on a casebook will need to create an account. If your email address ends in .edu or .gov, you can create an account on our sign up page.
Once you login, your account menu will appear in the upper right corner, and from there you can access your profile and dashboard or you can sign out.
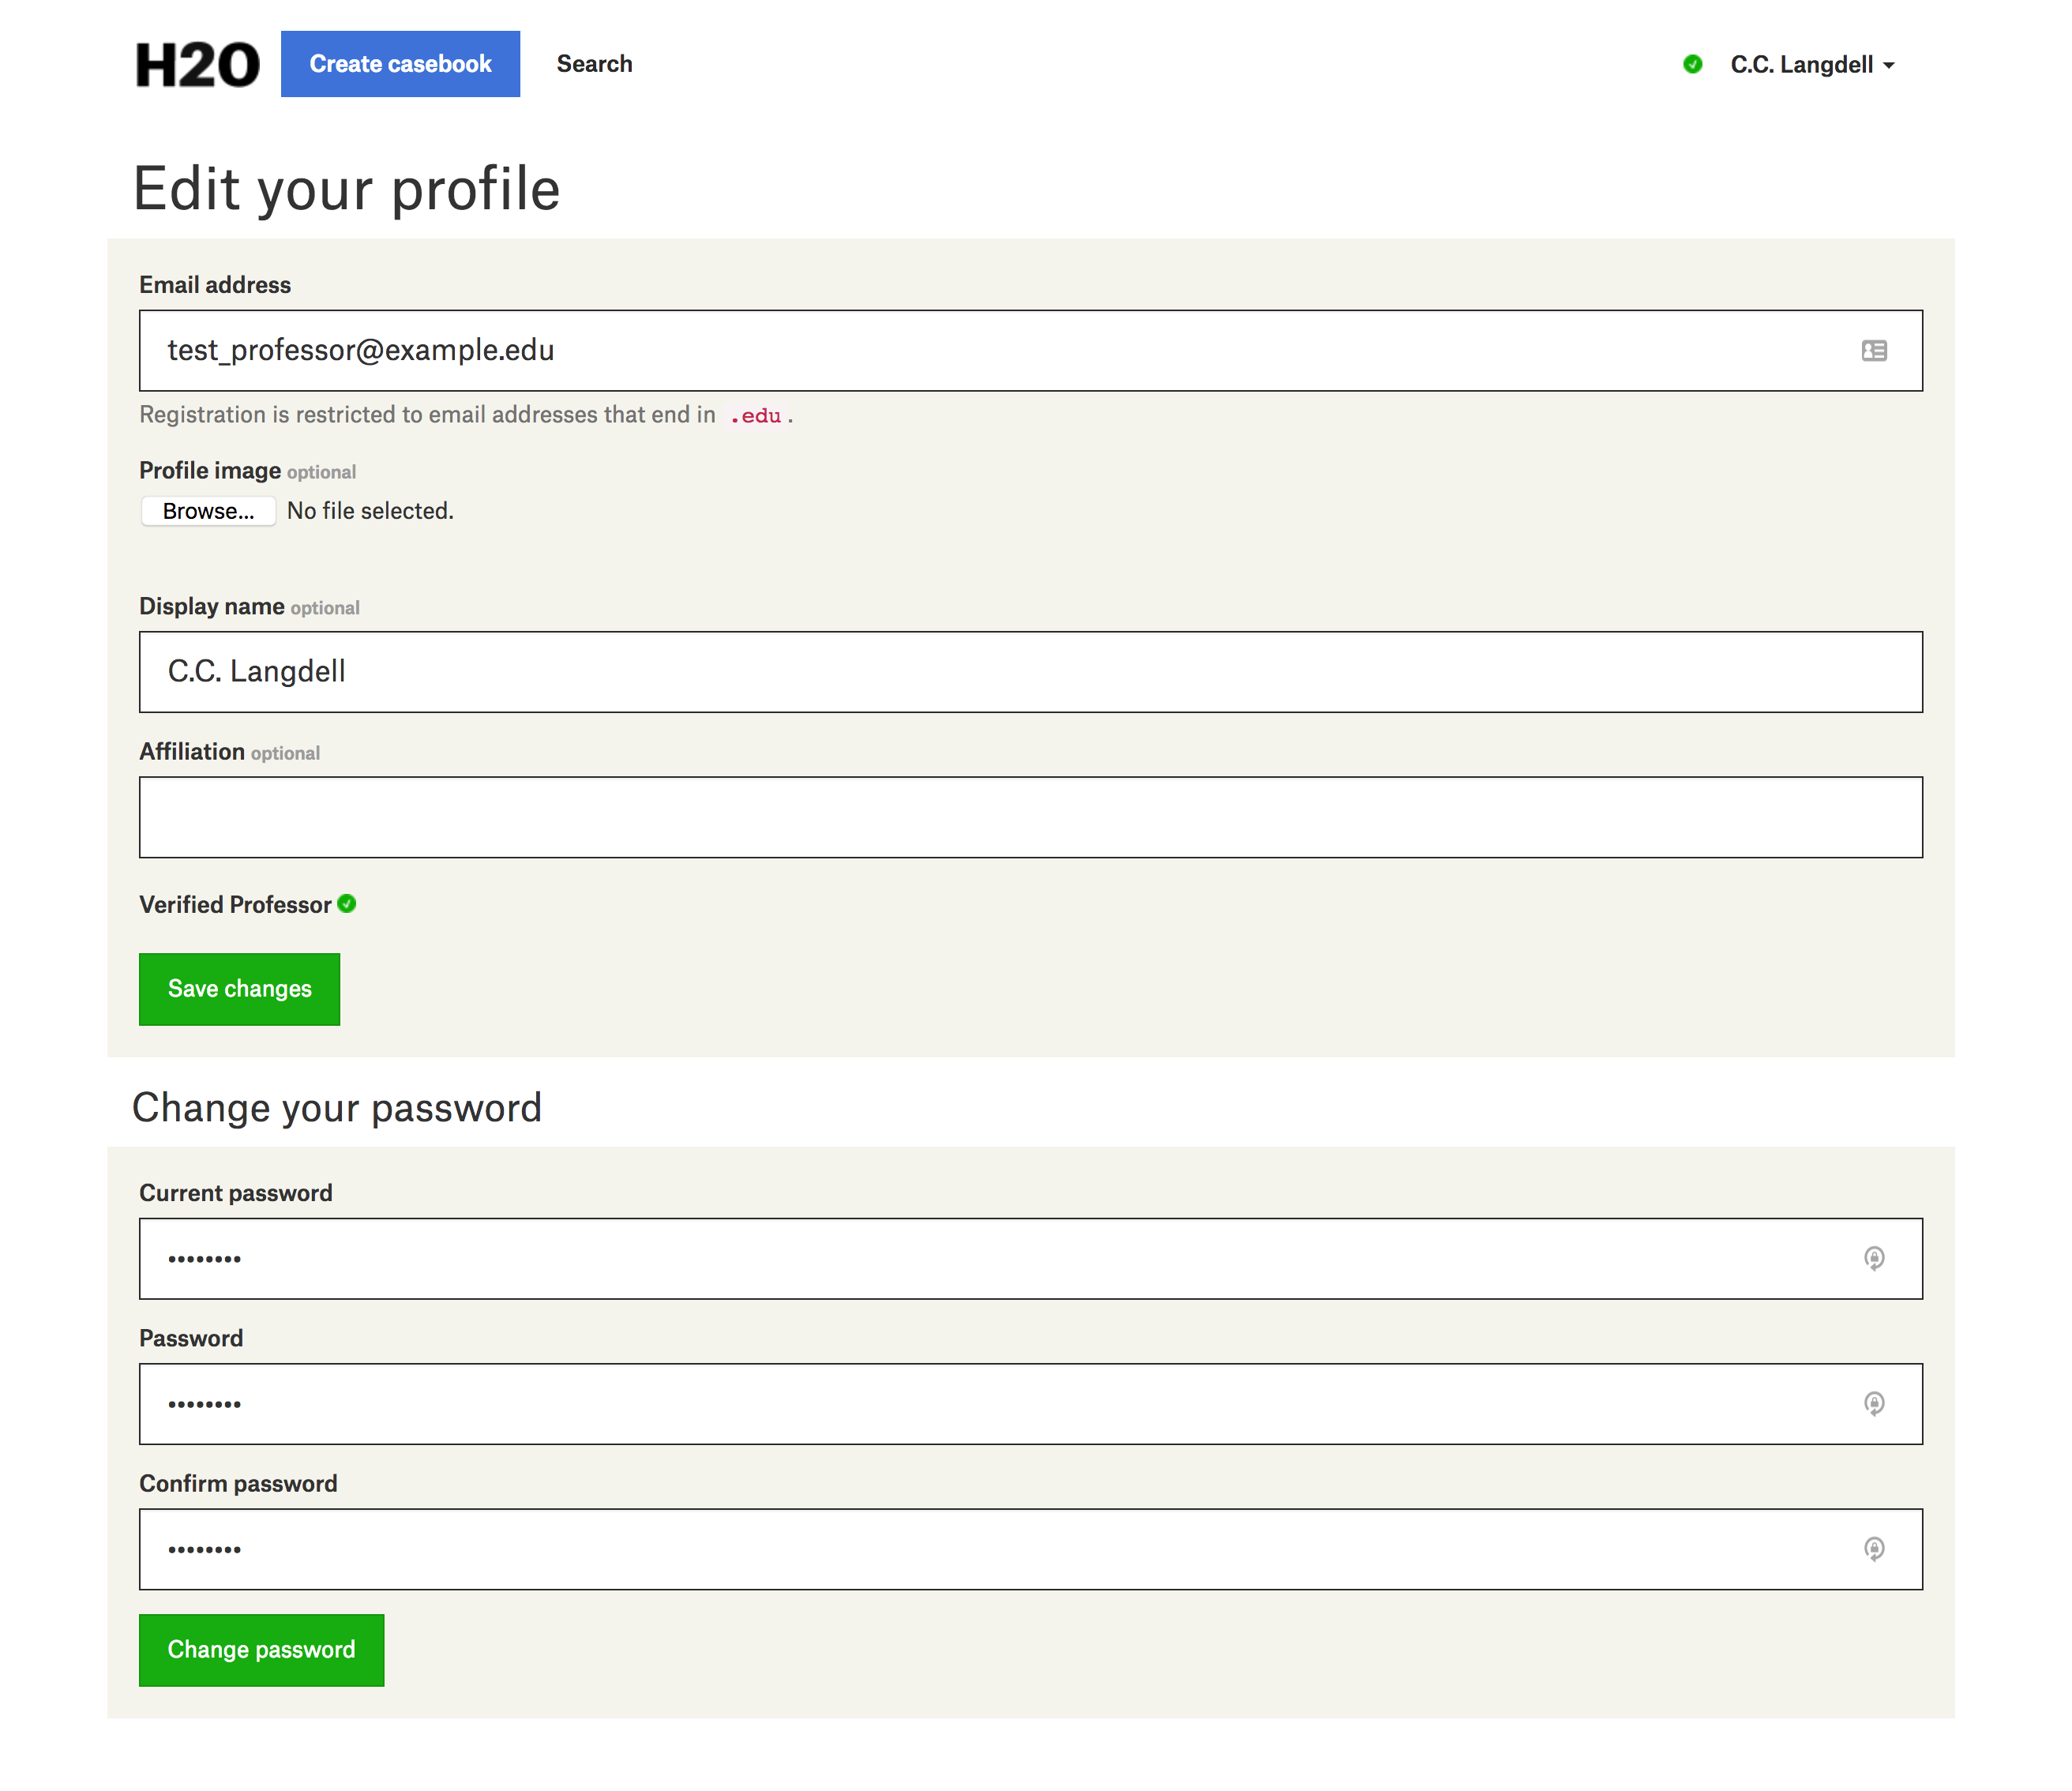
Your Profile
Complete your profile by adding your display name, your affiliation, and any other information you’d like to appear on your author page.
Verified Professors
At the bottom of your profile, you can request Verified Professor status to get a green check mark next to your name and ensure that your casebooks appear in search results. Verified Professors also have access to teaching notes, image uploads and video embeds. To become a Verified Professor, check the box at the bottom of your Profile and click Save to send a request to our team.
Your Dashboard
Your dashboard is where you’ll find all the casebooks you’ve authored, and where you can view any books you’ve followed.
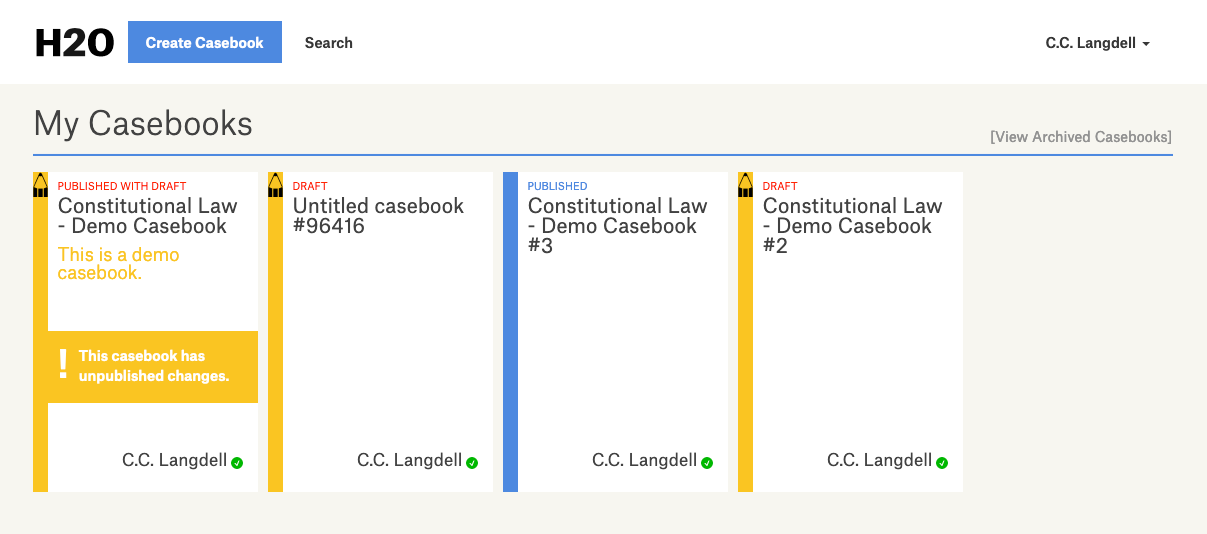
Once you’ve logged in, access your dashboard from the account menu in the upper right corner of the screen.
Creating a Casebook
Once you’re logged in, you’ll see a ‘Create Casebook’ button at the top of your page.

There are two ways to create a casebook on H2O. You can build a new casebook from scratch or you can adapt an existing casebook.
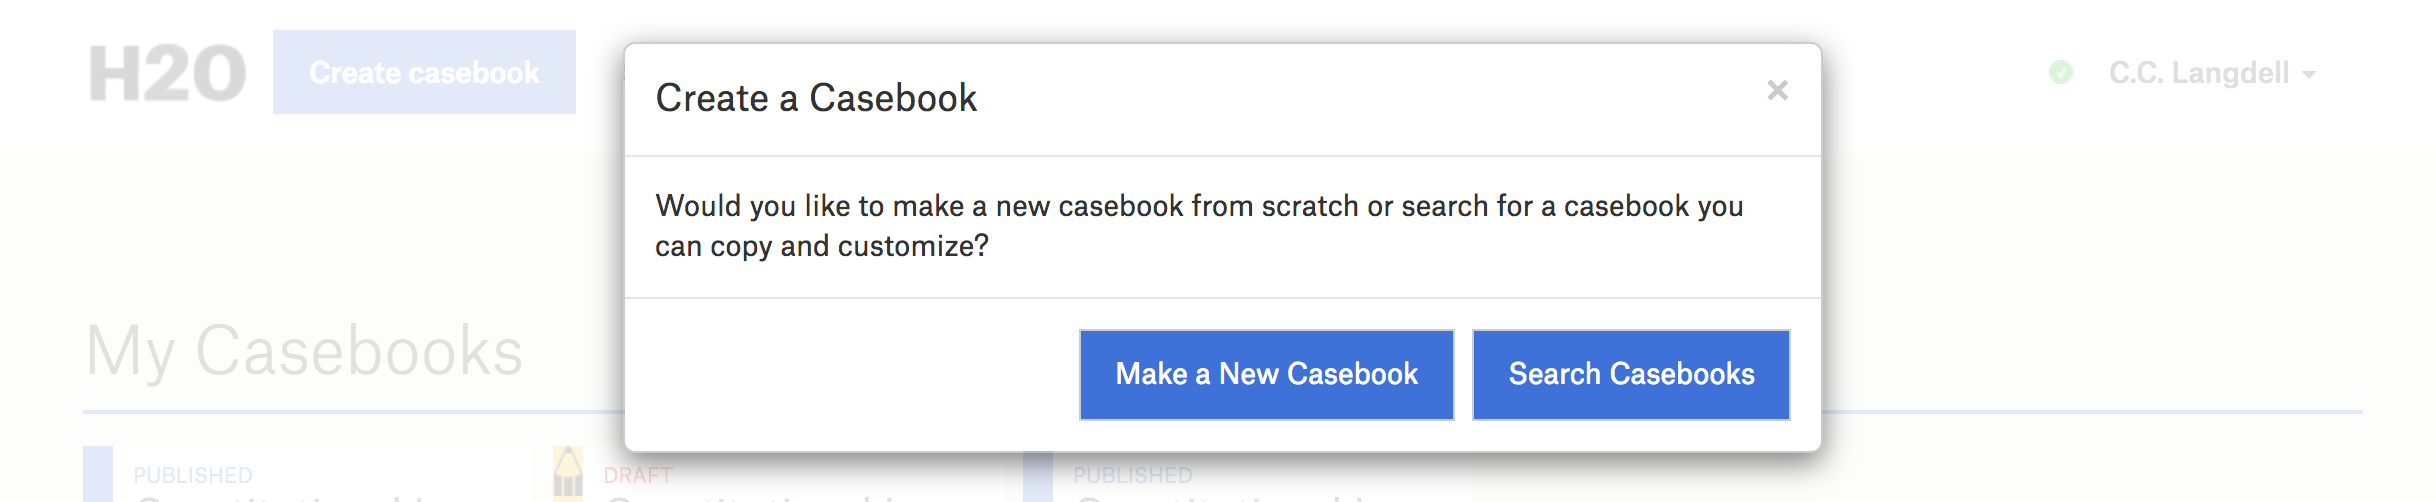
Create a new casebook
Building a new casebook entails adding all of your own content into H2O. There are many different ways to do it, but here’s a method we like and recommend:
- 1. Add a title and a description that will be surfaced in Search.
- 2. Add the sections and sub-sections that form the basic structure of your casebook.
- 3. Add the resources (cases, texts, links) you want to each section.
- 4. Annotate individual resources using elisions, highlights, links and notes.
- 5. Publish your casebook
Skip ahead to the Adding Content section below to learn more about each of these steps.
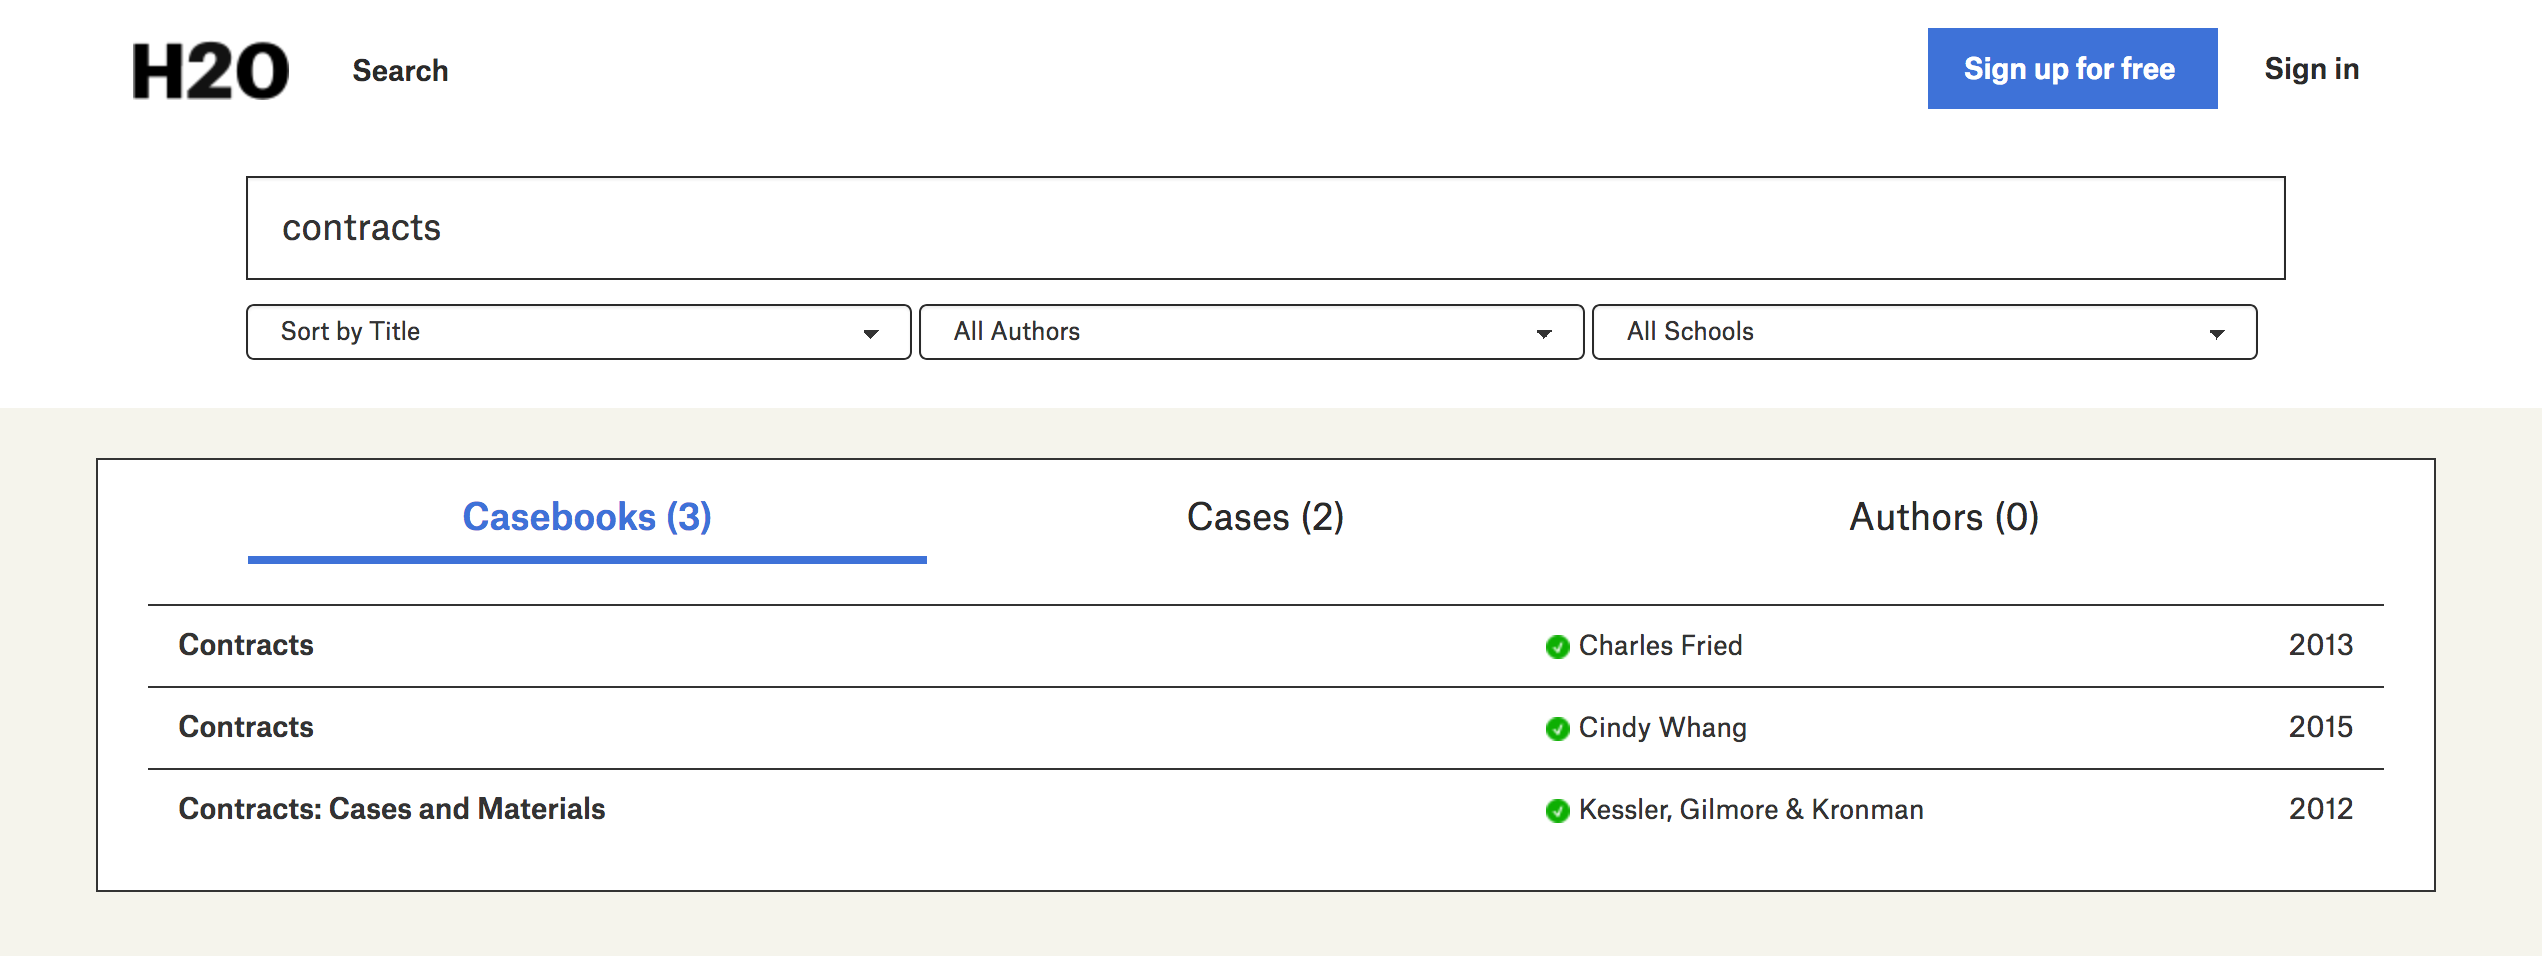
Adapt an H2O casebook
To adapt an existing casebook, search our database of casebooks for the one you want to use as a starting point. You can search by keyword (like “Torts”) or by author (like “Zittrain”).
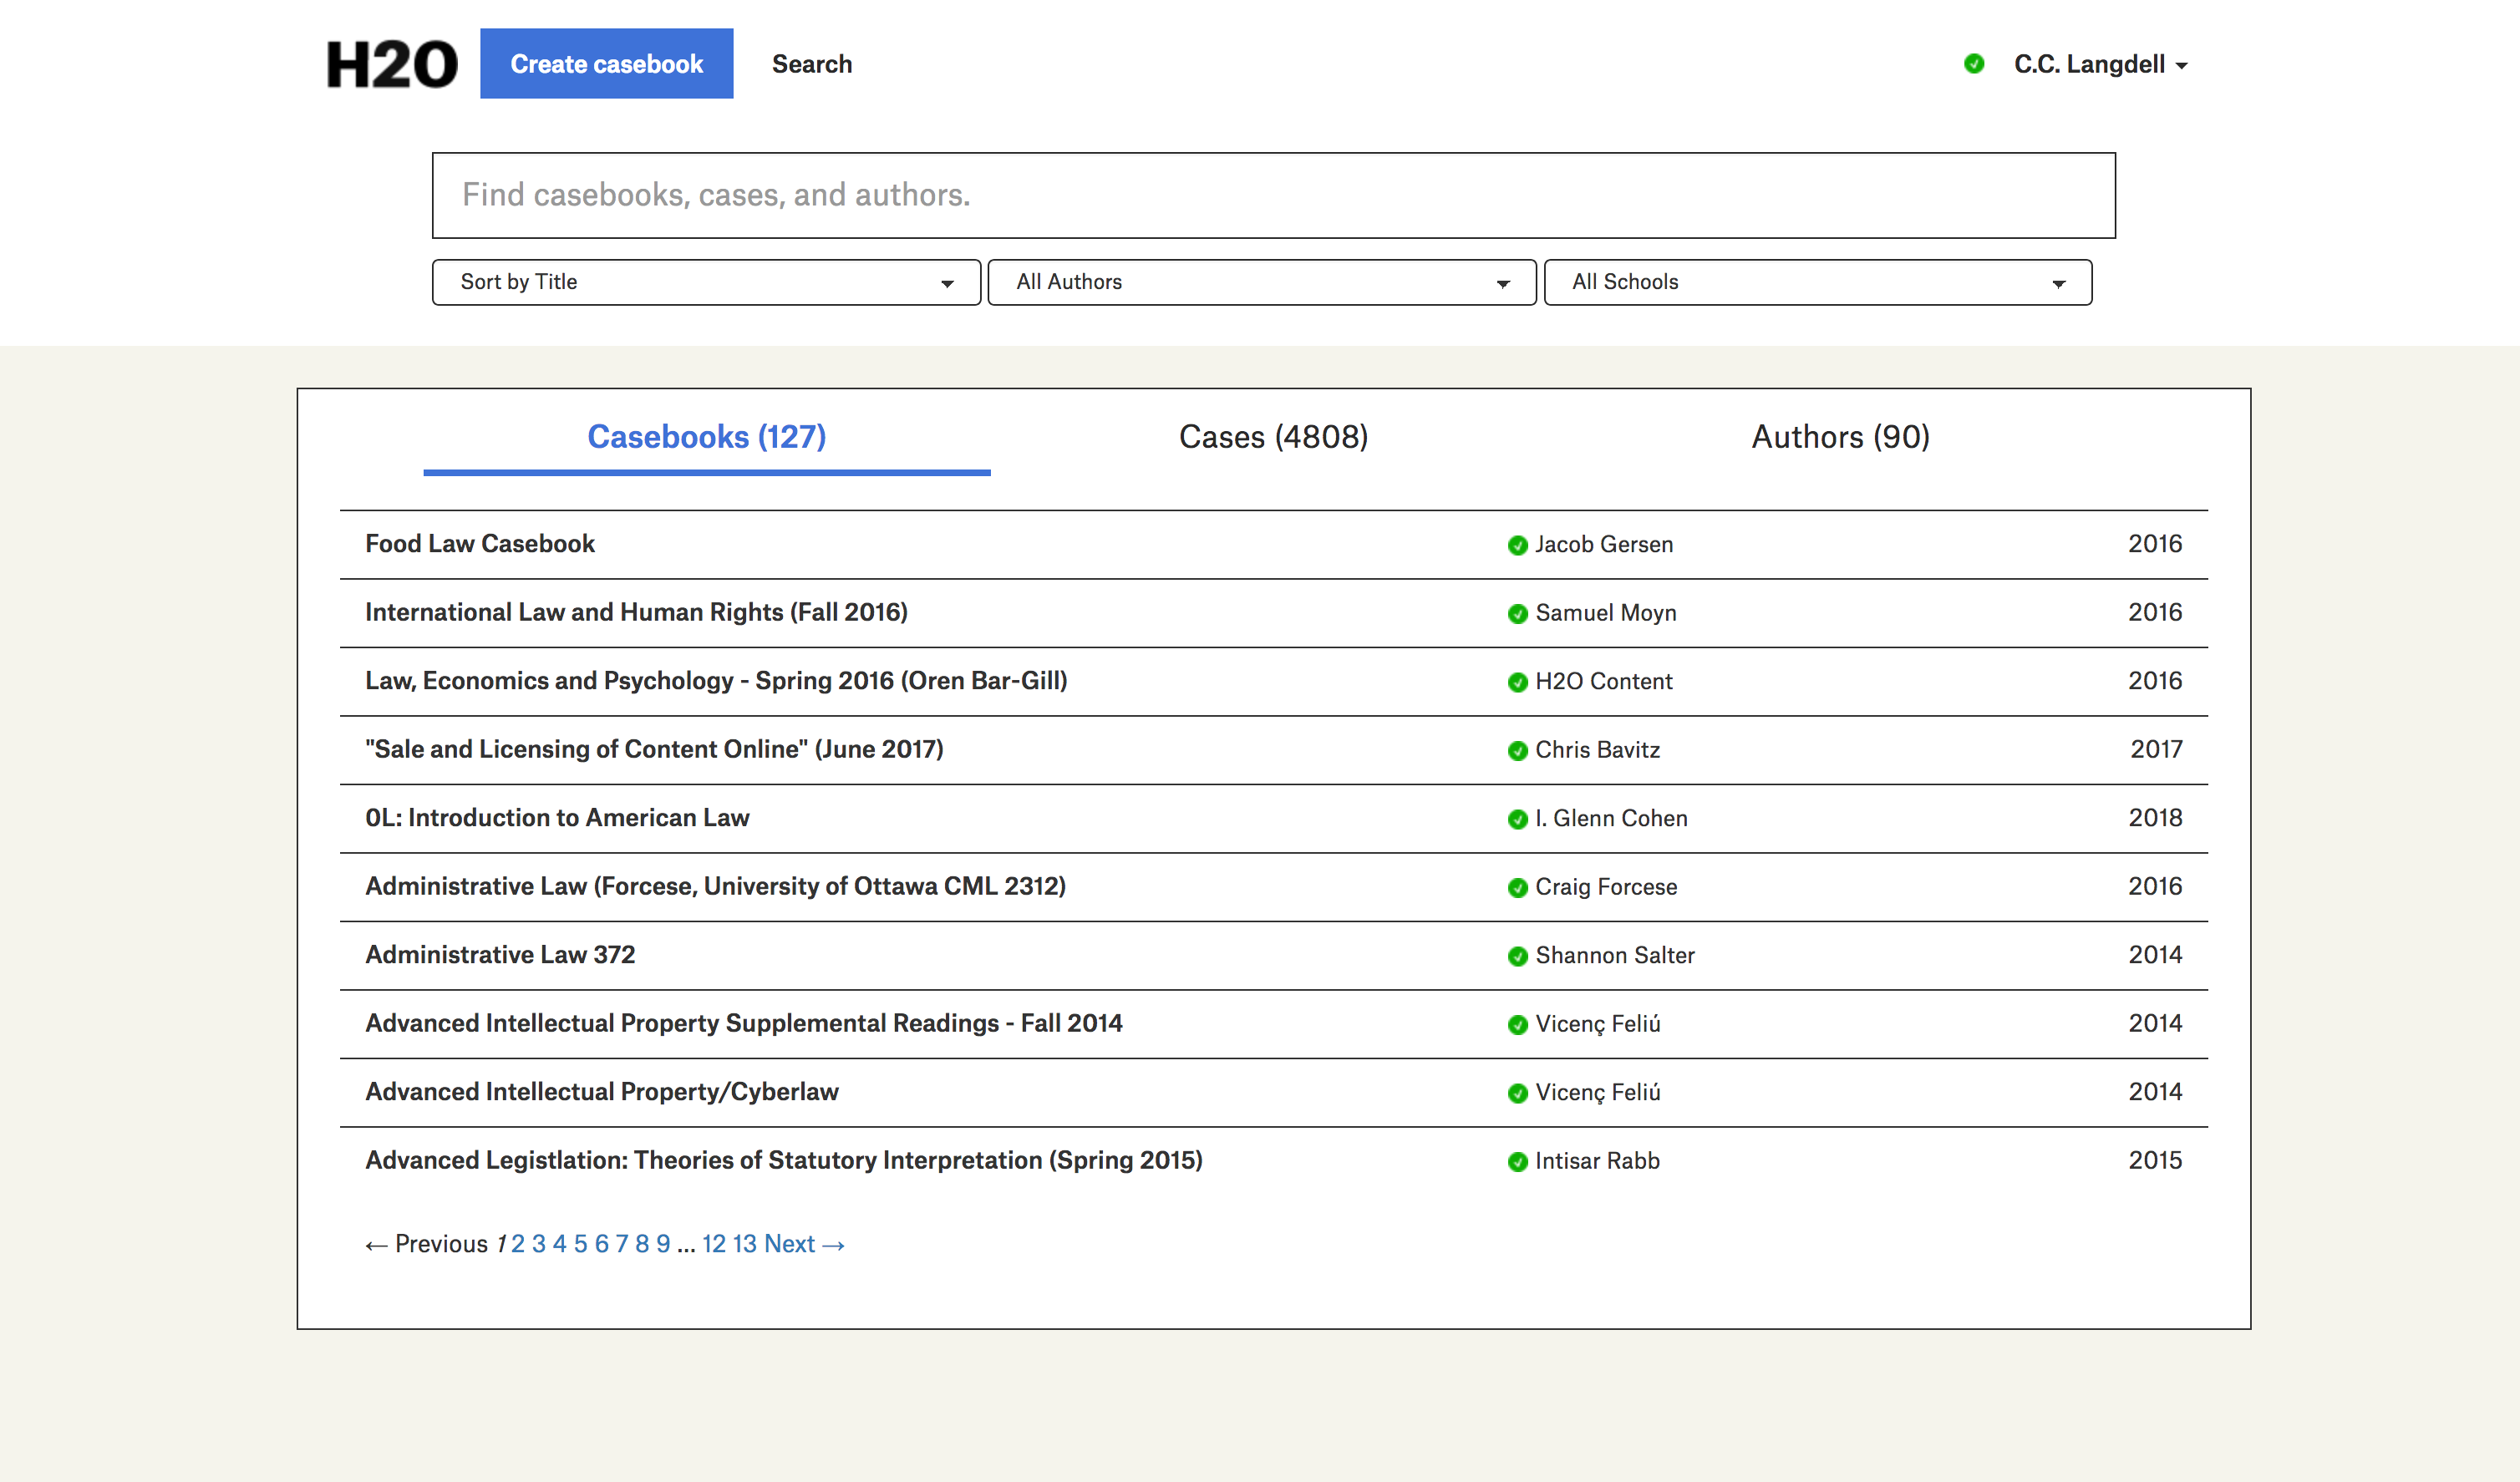
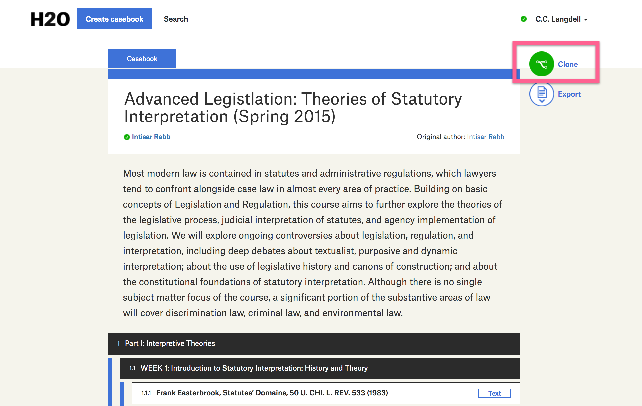
In order to “remix” or adapt a casebook, you first need a copy of it. When you find a casebook you like, make sure you’re logged in and click the ‘Clone’ button along the right side of the book. The entire book will be copied into a draft that is now in your own Dashboard.
Once you’ve cloned the casebook to create your own draft version, you can make changes by adding or deleting sections or resources, re-ordering the casebook, and by making your own annotations.
If you’d like to mix and match sections from a few casebooks to create your own, first, make sure you’re logged in. Then, create a working draft in your Dashboard. Finally, navigate to the sections of the casebooks you want to use, click ‘Clone’ along the top right side, and select the working draft where you’d like the section to appear. Repeat this process until you’ve got all of the sections you want in your draft casebook.
Describing Casebooks
Naming and describing your casebook helps students and colleagues find your work more easily. You can edit the title of your casebook, add a subtitle, and write a description at the top of your draft casebook. These fields are surfaced in search and can help other professors find open casebooks that may work in their classrooms.
The headnote on your main casebook page is essentially your cover page - readers will see it on the landing page of your book.
Hit the Save button after making any changes to these fields.
Casebook Collaborators
Watch our video tutorial on adding collaborators.
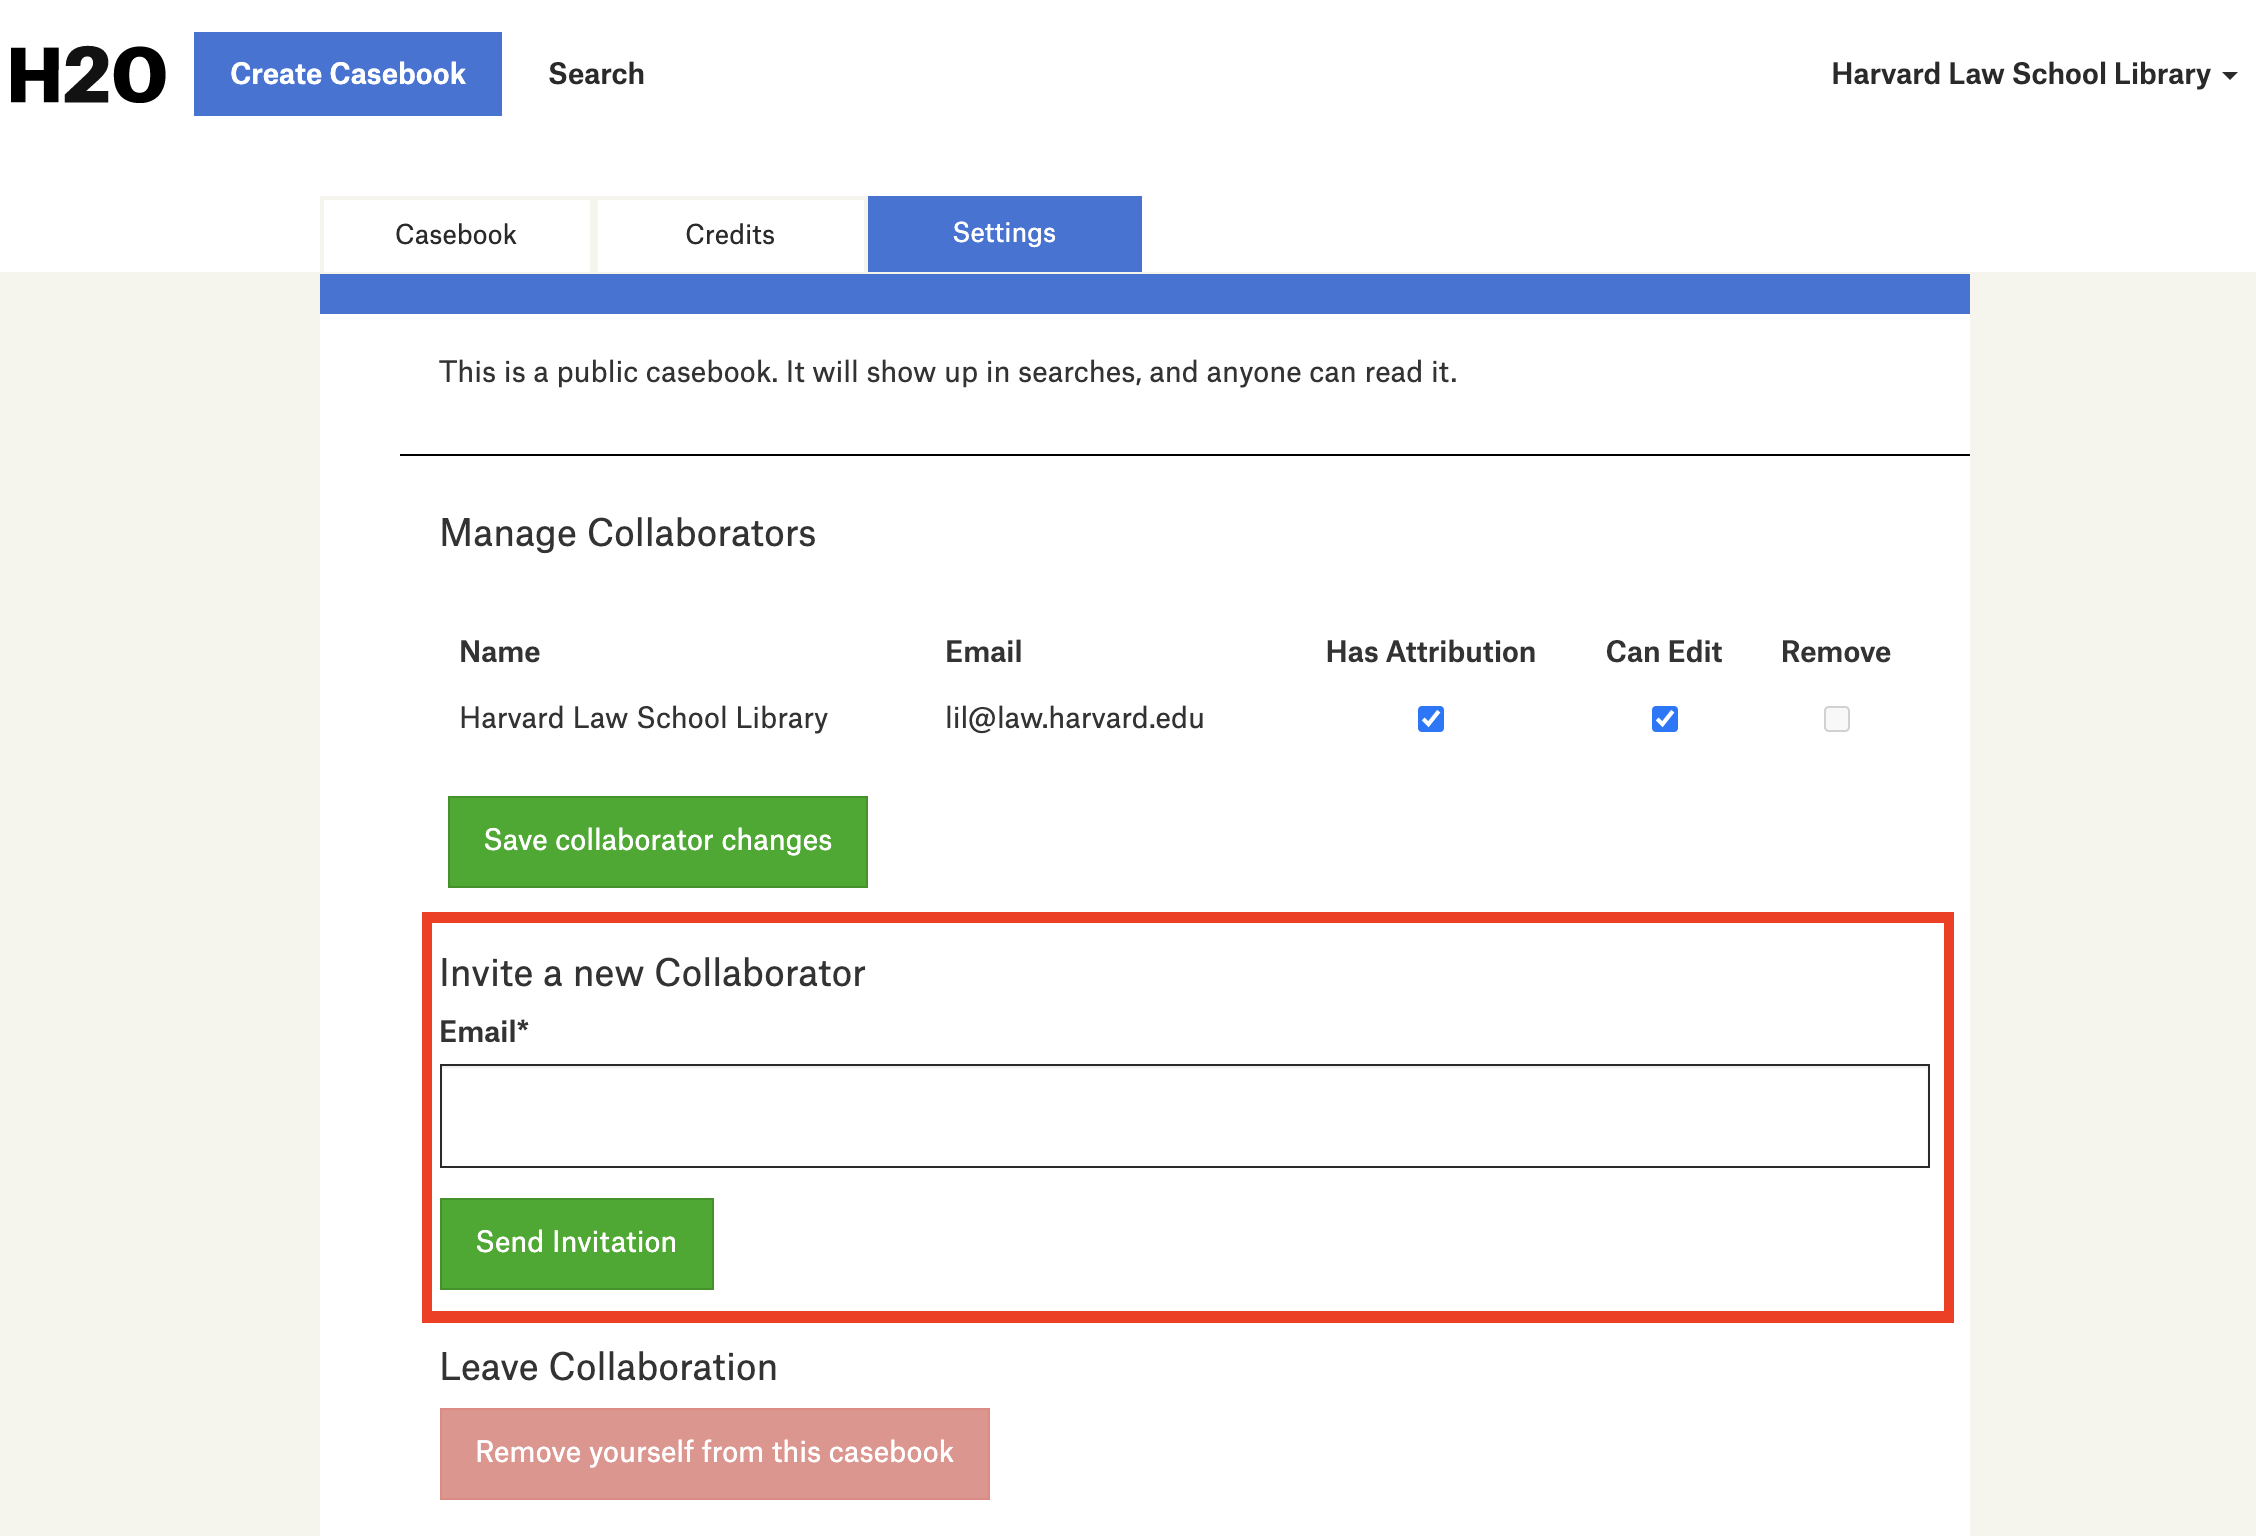
Possible collaborators on your casebook include support staff, librarians, other professors, and students. Once you have a draft started, add them to your book by clicking on the ‘Settings’ tab and entering the email address of your collaborator in the field labeled “Invite a New Collaborator”. They will receive an email with a link to access your book. If your collaborator already has an H2O account, make sure you’re using the same email address they use for their account. If they do not have an account, they will be prompted to create one.
Once you’ve added your collaborators, you can use the checkboxes to grant the appropriate attribution and editing permissions.
Adding Content
Content types
Types of content you can add to an H2O casebook are below:
- Legal Documents - H2O supplies all United States court cases through 2018, and the latest published version of the Federal U.S. Code as found on the govinfo website. You can search our database for the citation or keywords of the case or section of code you want to include. When you select the appropriate document from the search results, H2O will add it to your casebook.
- Custom Content - Text, images, and embedded videos can be added through the Custom Content section. Text resources are often introductory or explanatory notes prepared by the author to offer context about a section or case. They can also include questions, problem sets, statutory references or any other content the author adds. If you are working with cases decided since 2018 that are not yet available in our database, you can copy and paste those opinions in as text. Verified Professors can also upload images or embed videos through the text editor.
- Teaching Notes - To add teaching notes to your casebook that will help other professors use your casebook, simply add them as a Custom Content resource and check the box restricting that content to Verified Professors in H2O.
- Links - Links are resources that point to materials hosted elsewhere on the web. These can be publicly accessible websites, government reports, articles, blogposts, etc. Links can also point to restricted content for your students to access via their law school login.
- Sections - Sections and subsections help organize your casebooks by topic or week. We recommend you create these first to give yourself a working structure and then add content within each section. Note that you can move content between sections if you need to do some re-ordering once you get started.
Individual add
Along the top right side of your book, you’ll see the ‘Add Section’ and ‘Add Content’ buttons. Use these to add individual items to your casebook. If you are building the structure of your book in H2O, we recommend following the steps in the order below. You can also watch our video tutorials on addding sections and adding resources to your book.
- 1. Add the sections and sub-sections that form the basic structure of your casebook. To add a section you can click ‘Add Section’ at the top right side of your book.
- 2. Add the resources (legal documents, text, links) you want to each section. To add your resources, click ‘Add Resource’ and select the appropriate type from the buttons along the top of the window. For Legal Documents, search for cases or code by entering a citation or key words. For Custom Content, add text right to the text box, and use the image and video buttons to add multimedia. For links, paste your link into the field and add a description or edit the title.
- 3. Annotate individual resources using elisions, highlights, links and notes. Skip ahead to annotating content for more.
Quick add
The Quick Add tool is a powerful, multi-purpose form that lets you quickly add many different types of content in a variety of ways. It is located at the bottom of the table of contents for your casebook.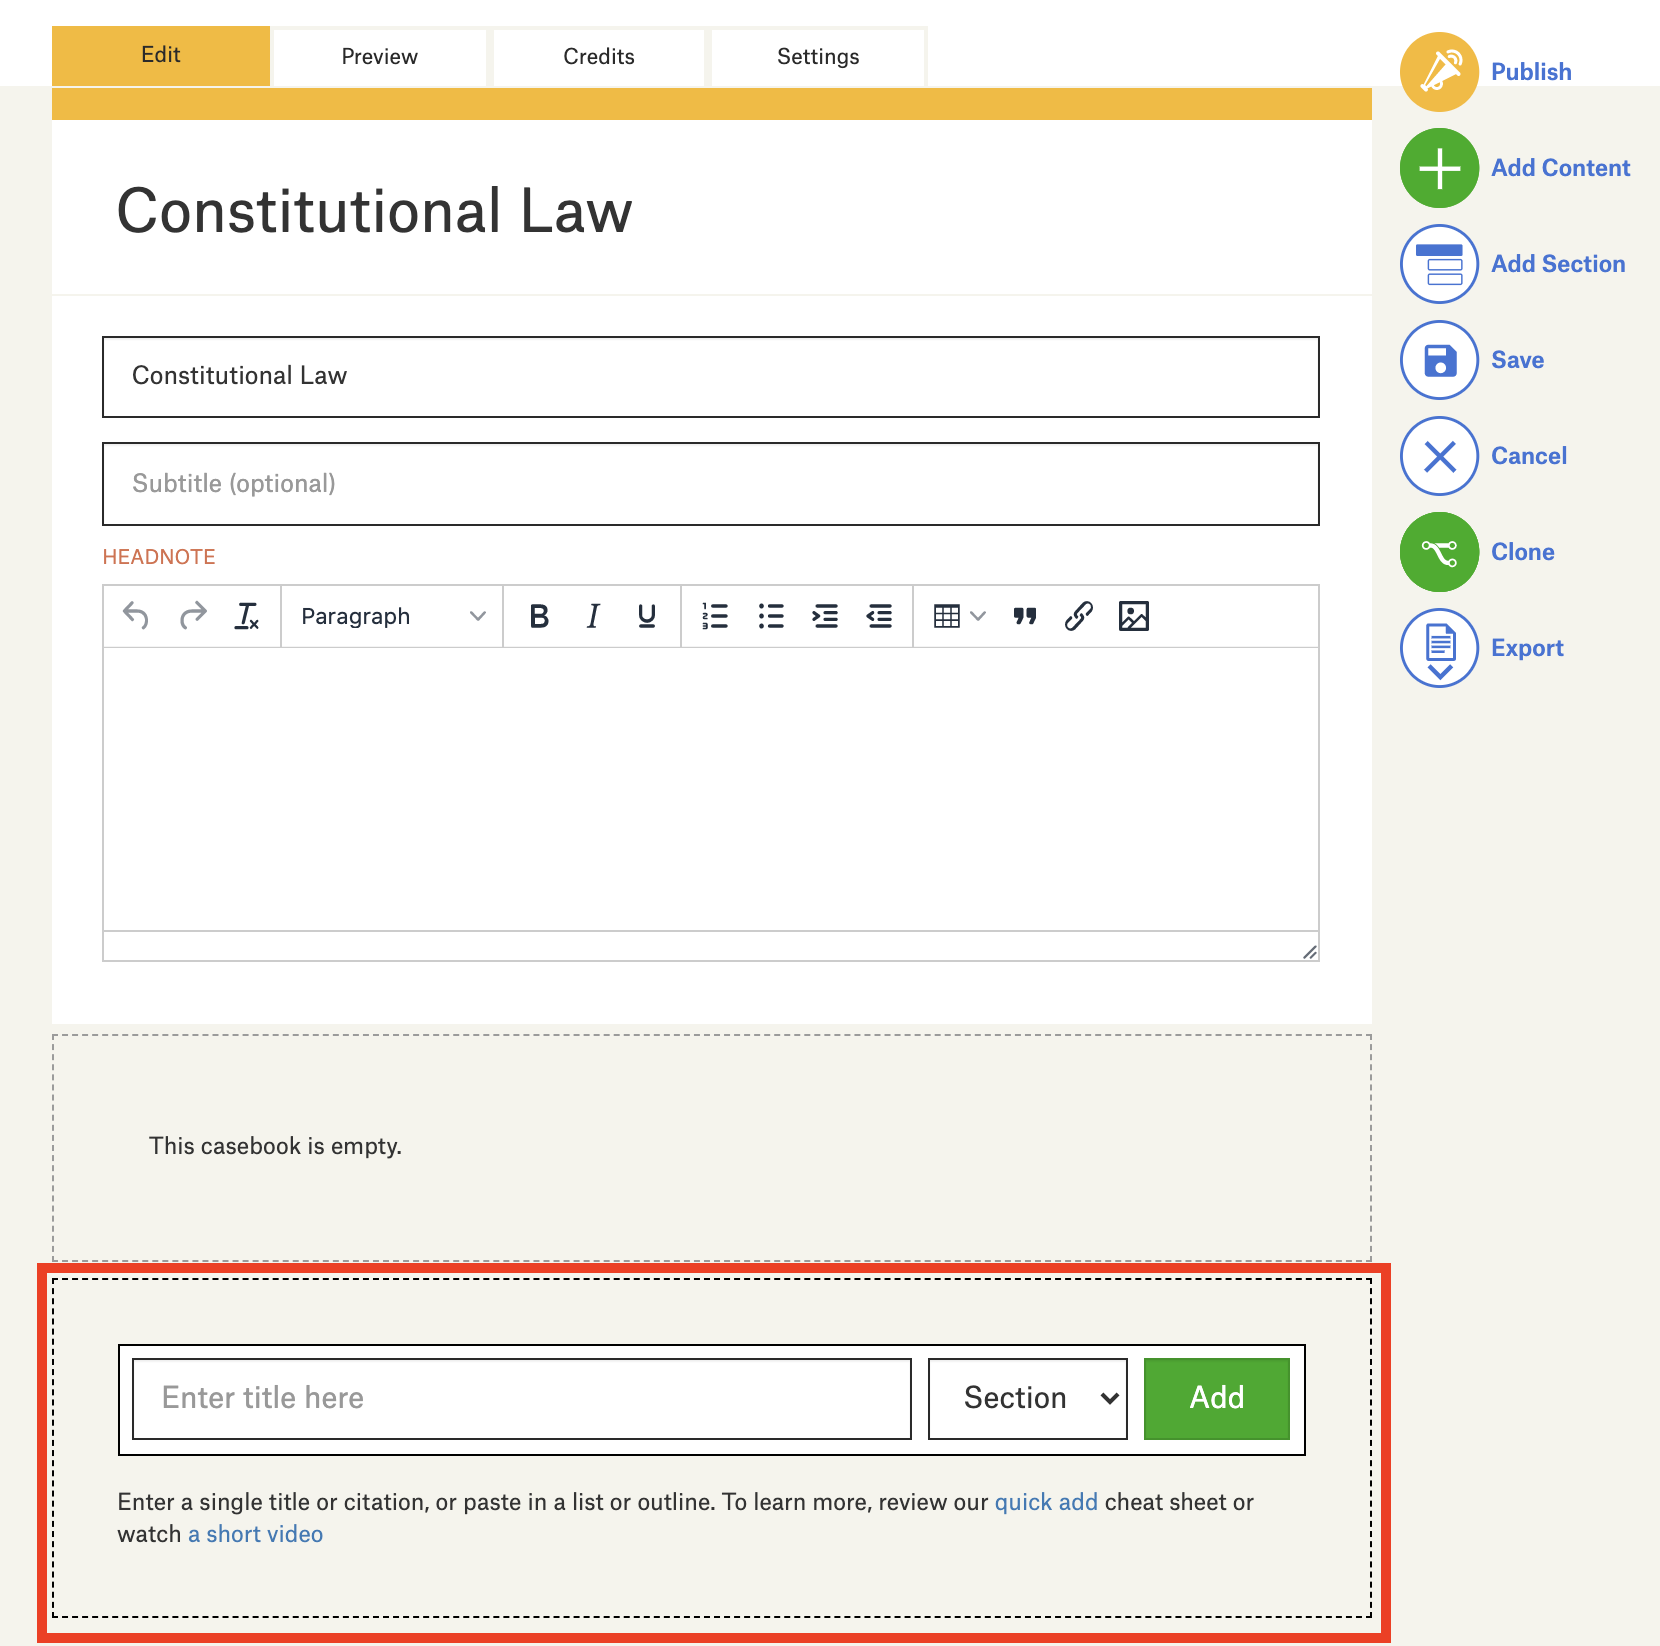
If you have an outline or a list of items you want to include, you can copy and paste the entire outline into the Quick Add window at the bottom of your casebook. This will ingest those items into your H2O book where you can finalize your entries, add text, and change the order.
If you prefer to build your outline within H2O, or simply want to add items one by one, you can drop single items (case citations, links, heading names) into the Quick Add window.
You can also use the Quick Add window to grab sections or resources from other H2O books, or to add cases directly from CourtListener. For H2O resources, simply copy and paste the URL from the resource you want to add to your book and paste it in the Quick add window.
Once you’ve added your resources via Quick Add, any item that needs further attention will be outlined in red. For cases, if H2O is unable to match the given citation or case name, you’ll need to click ‘Specify Case’ and then use the search tool to select the case you want.
From another H2O casebook
H2O allows you to clone and adapt entire casebooks, but it also lets you clone and adapt individual sections, cases, texts and links. Simply visit the content you want to clone and click the ‘Clone’ button.
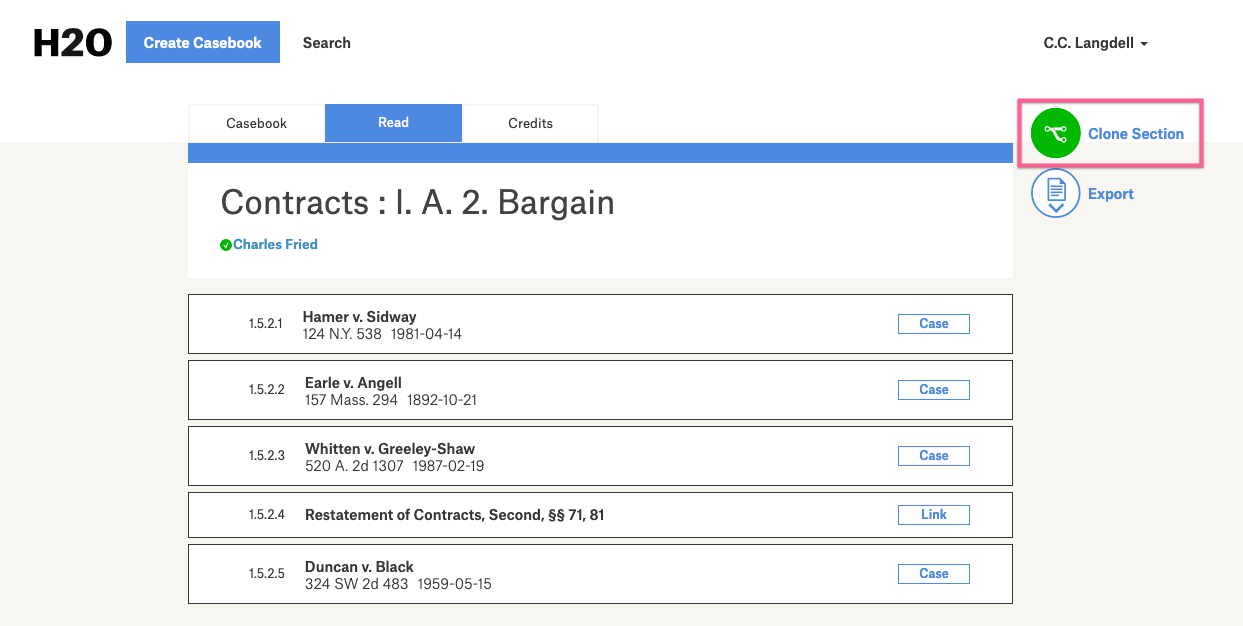
Then you’ll be shown a list of your own draft casebooks. Select the casebook to which you’d like to add the cloned material.
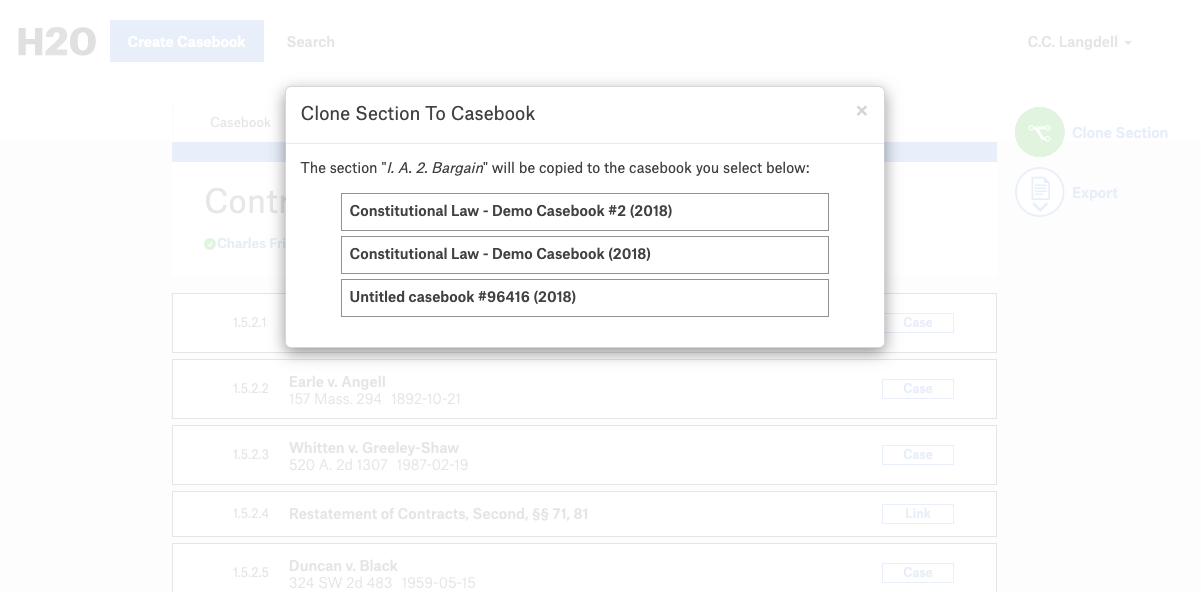
Once you’ve added the cloned section or resource to your casebook, you can move it around or edit it however you like.
Annotating Content
Watch our video tutorial on making annotations here.
Within H2O you can edit legal documents and texts as you like. To get started, highlight a portion of the resource to surface the annotation menu. Annotations can only be added to a casebook that you have permission to edit, and is in draft mode.
Elide
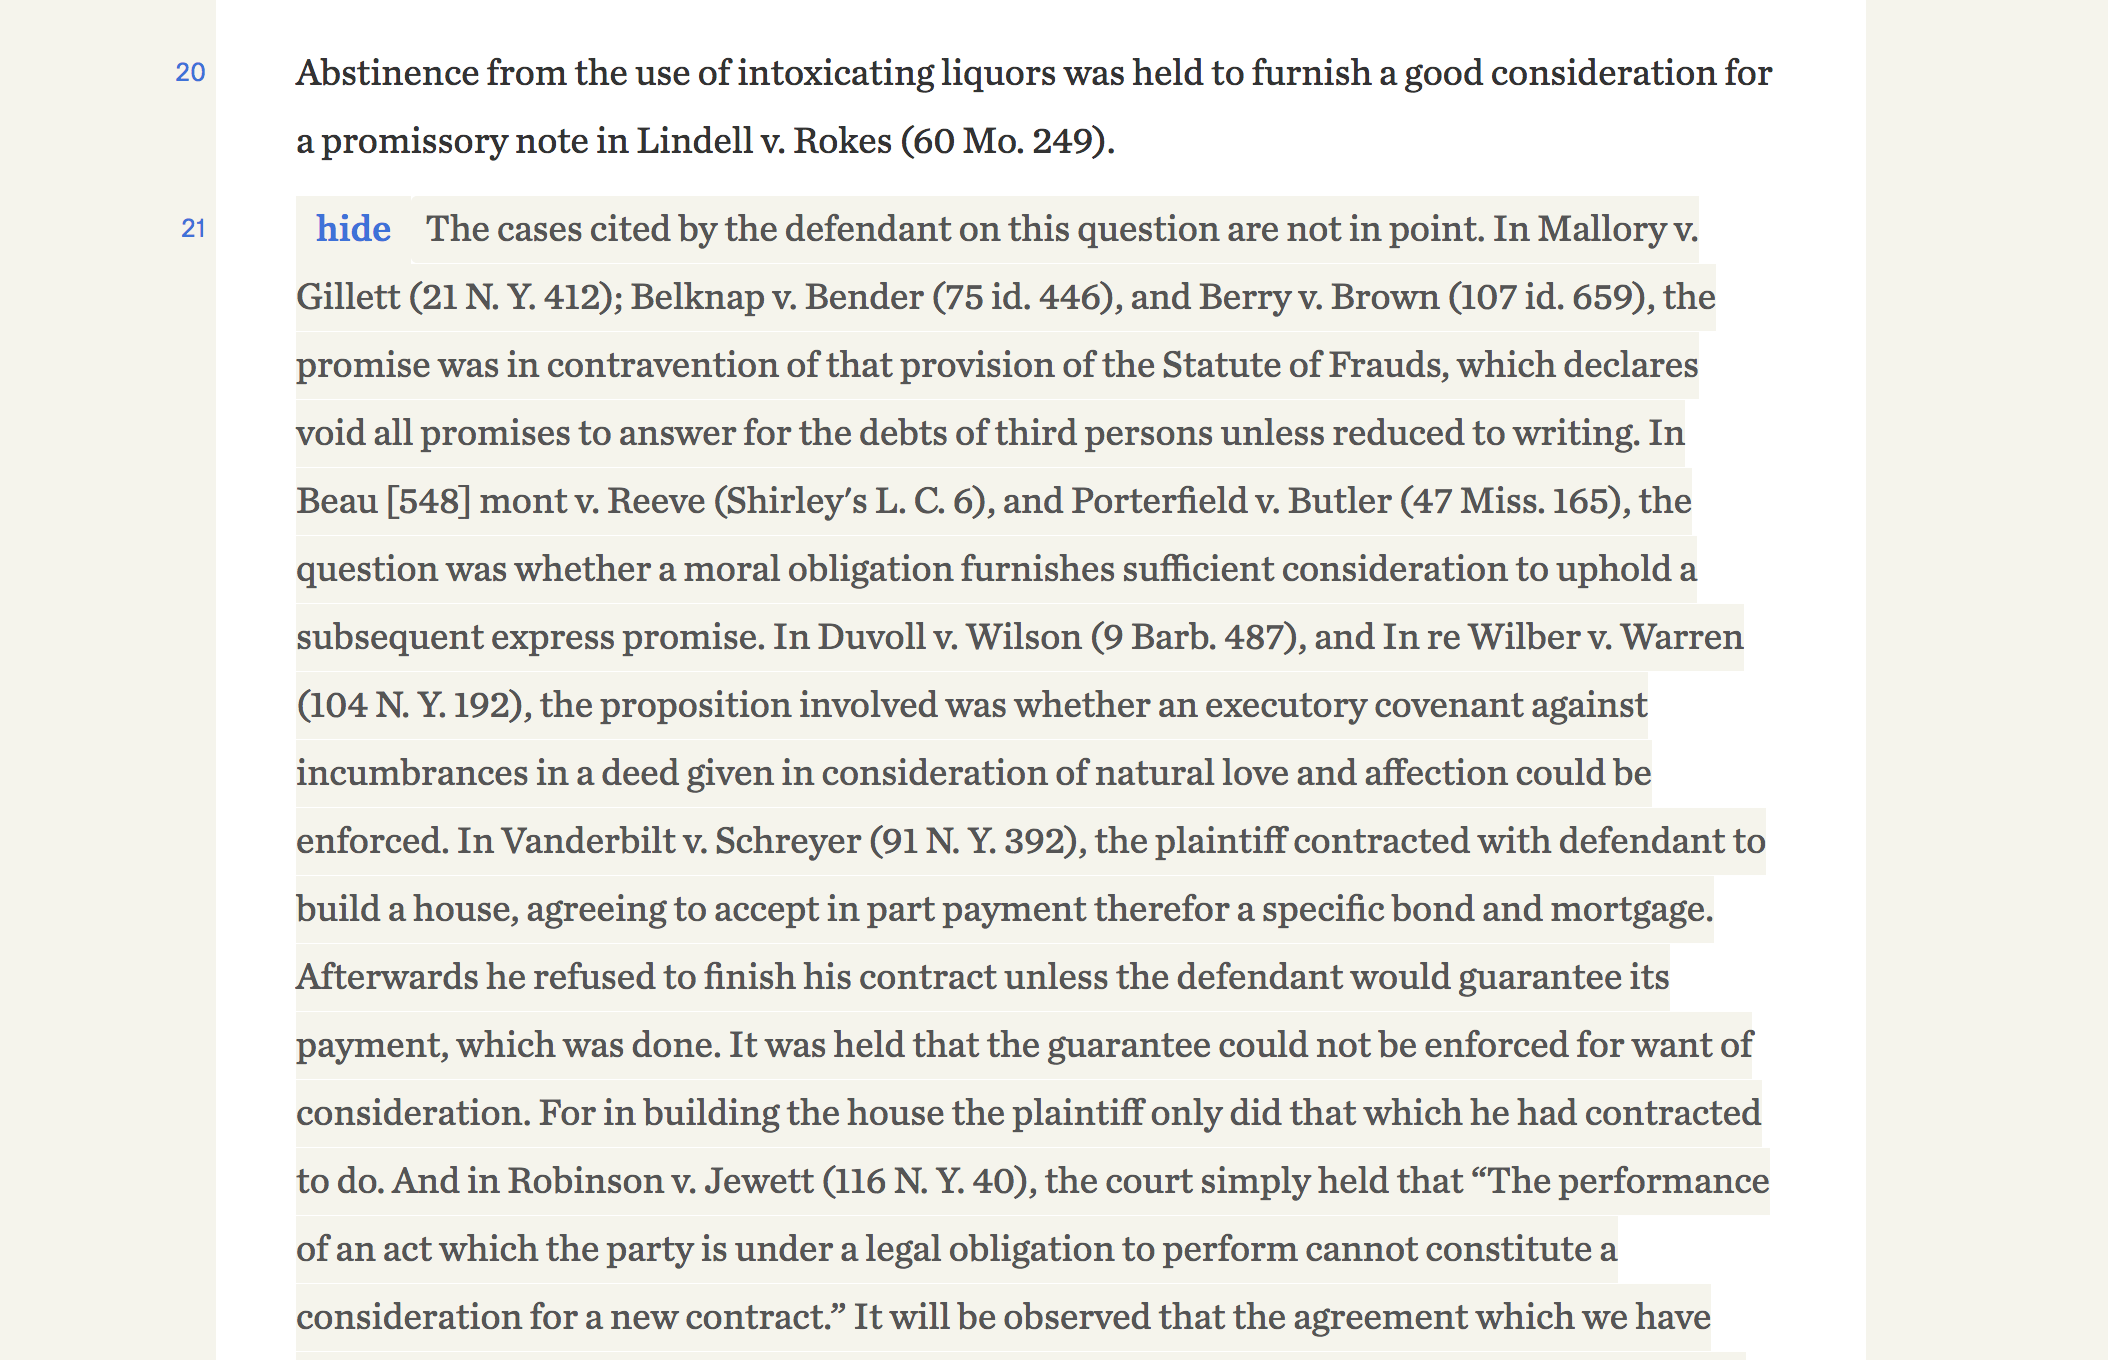
This is the function that allows authors to “remove” parts of a case to make it more manageable for readers. In H2O, eliding a portion of the case does not delete it. Rather, the elided section is hidden from view behind the blue ellipses. Students can click the ellipses to see what they’re missing and further explore what interests them. Here is an example of an elision:
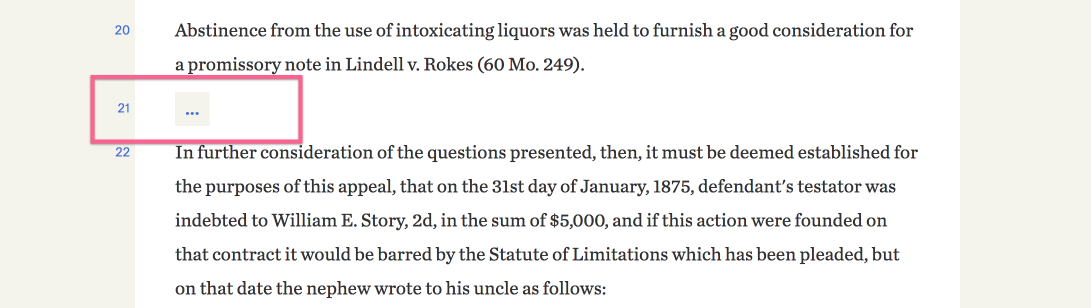
H2O hides the text but readers can view the hidden text by simply clicking on the ellipsis.
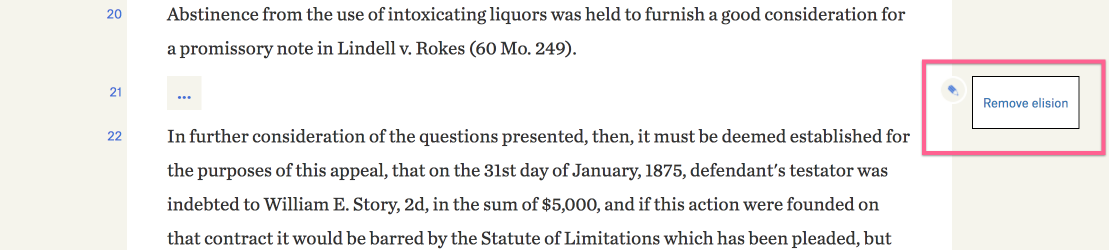
Once you have made an elision, you may remove it by clicking the edit icon in the right margin and selecting ‘Remove elision.’
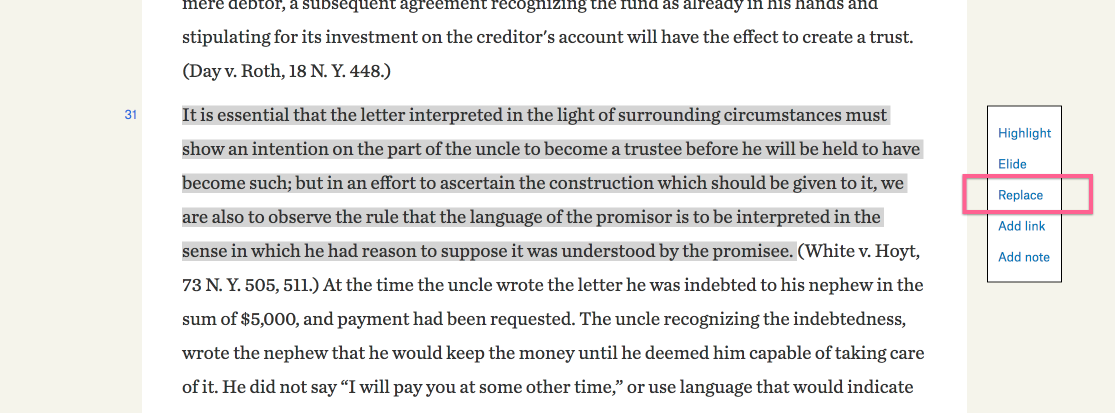
Replace
To elide a portion of the case and replace it with a short summary, authors can use the replace tool. Students will be able to click on the summary in blue text to view the full text.
To use this type of annotation, simply select the text you want to hide and then choose ‘Replace’ from the annotation menu.
You’ll then be prompted to type your replacement text into a form. When you’re finished, press enter:
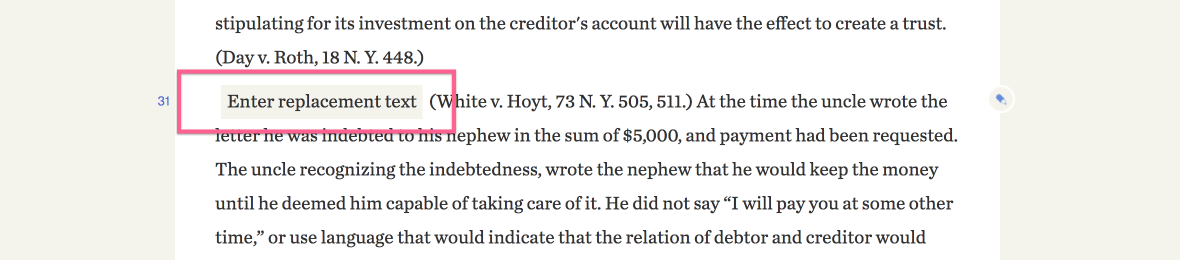
To remove or edit the replacement text, click the edit icon in the right margin and use the menu.

Highlight
Highlighting allows authors to highlight important parts of the case.
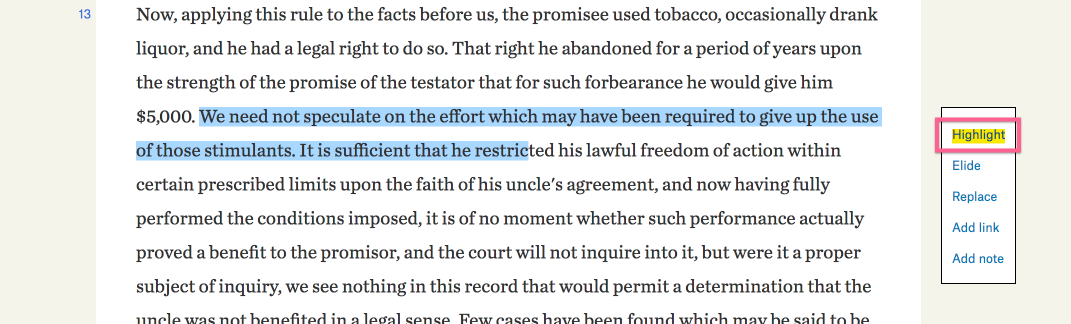

To remove highlighting, click the edit icon in the right margin and select ‘Remove highlighting.’
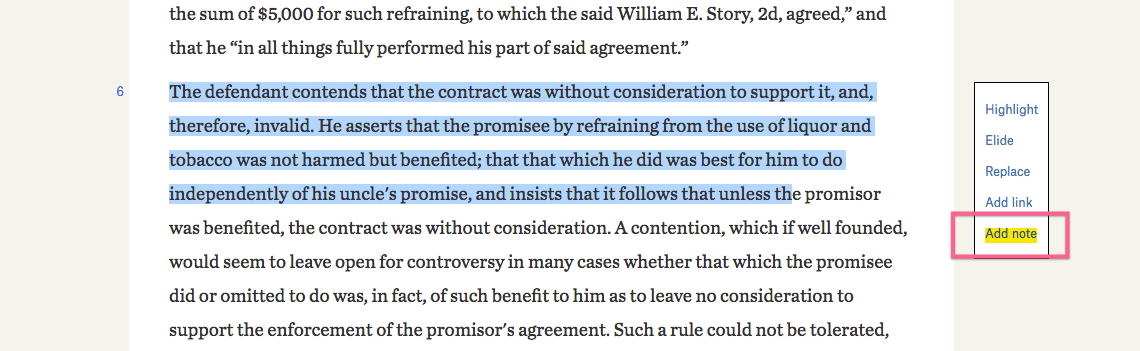
Add note
The note function allows authors to add their own context to a certain part of resource.
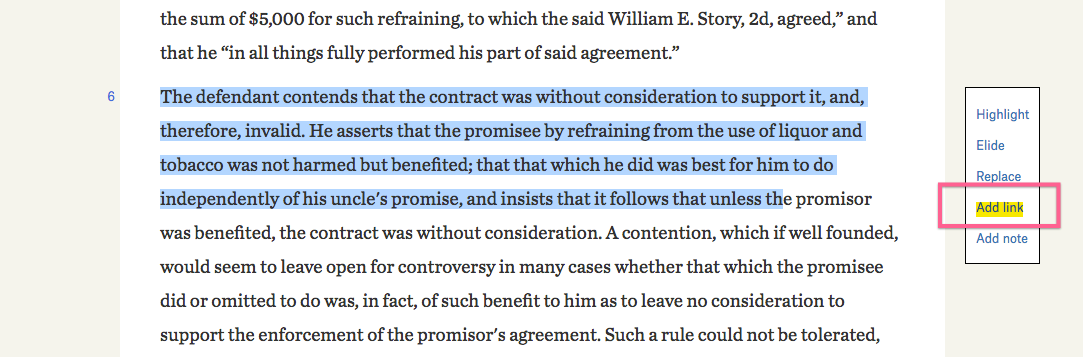
Add link
H2O allows authors to direct readers to external links relating to selected passages in any case or text resource. To add a link, select the desired text, then pick ‘Add link’ from the annotation menu and enter the URL, then press enter.
Correction
H2O provides access to millions of cases via CourtListener and the Caselaw Access Project, and allows authors to seamlessly integrate these primary legal documents alongside other digital content. These cases were scanned and run through Optical Character Recognition software to become machine readable. While OCR is a powerful tool, it is not perfect, and you will notice typos in the text of the cases. For the most part, the correct text can be inferred from the context, but if you’d like to “fix” those errors for your students, the Correct tool allows you to do so.
Arranging Content
Moving Content
Watch our video tutorial on moving content.
Once you’ve added resources to your H2O casebook or have found an existing book to adapt, content is easy to re-order by dragging and dropping individual resources or whole sections where you want them to go. To re-order the sections of your casebook, we recommend using the Collapse All button and then dragging and dropping sections up or down. To move individual resources, just grab the one you want and drop it in a new location. You can also easily nest content under a section heading by dragging it to the right.
Deleting Content
When you are working in a draft casebook, all sections and resources will have a grey X at the right hand side. Click that and confirm that you want to delete a resource to remove it from your book. Note that deleting a section will also delete all of the content within it. To delete a section heading but keep the content within it, first move the content to another part of your book and then delete the section heading.
Publishing Casebooks
Watch our video tutorial on publishing your casebook here.
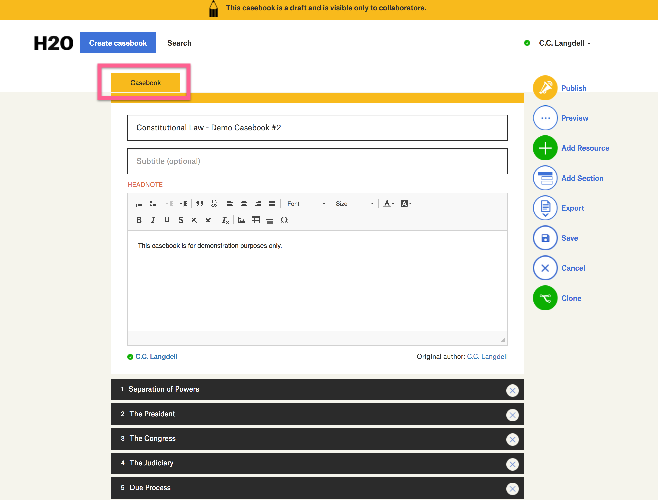
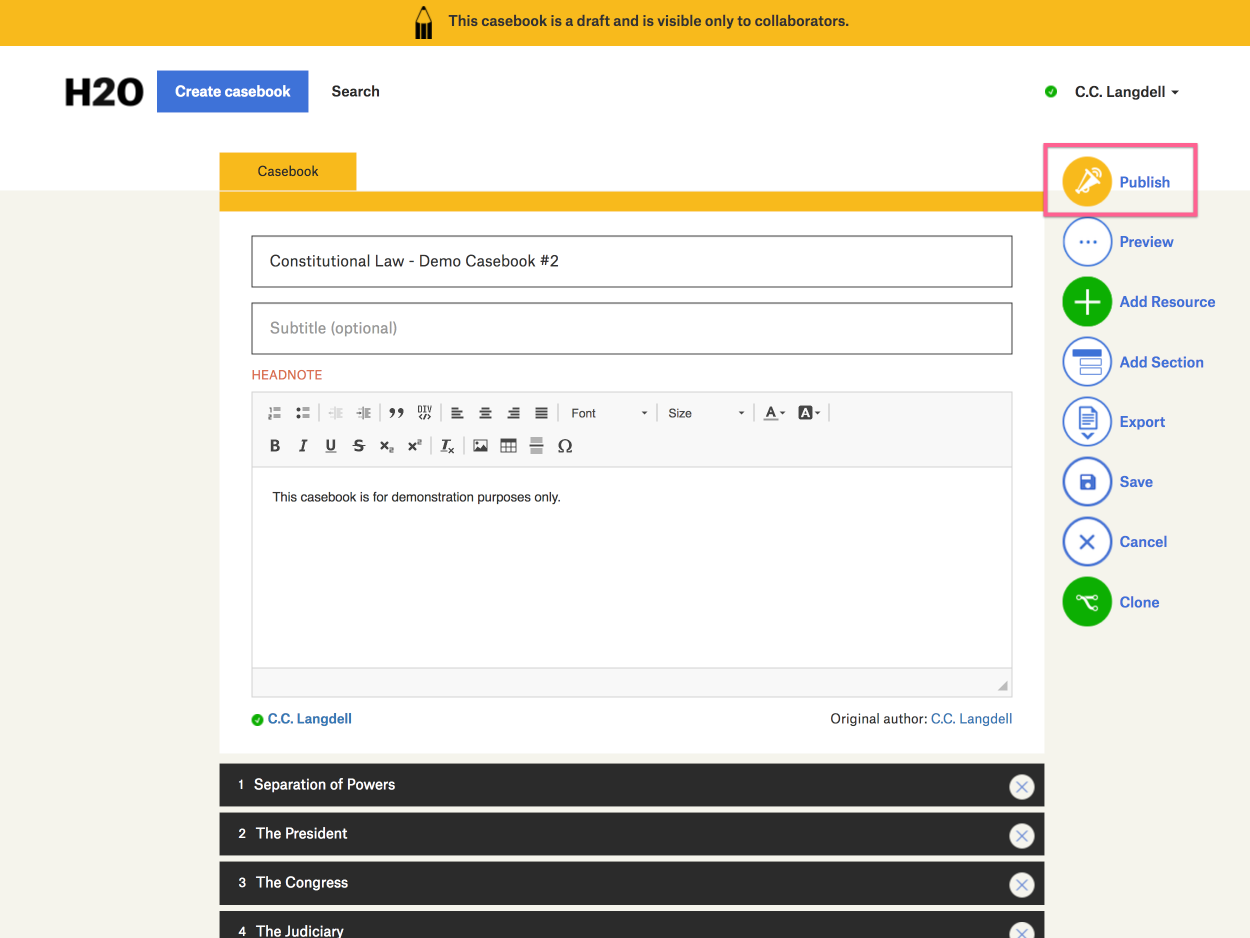
While you’re working on your casebook, it remains in “Draft” mode, indicated by the yellow banner at the top of the page and by the draft label on your dashboard.
When you’re ready to share the book publicly, click the ‘Publish’ button visible to the right of the contents.
You will be prompted to add some optional information to your casebook that will make it easier for others to discover and build on it, like a description.
If H2O needs a little more information before it can publish your casebook, the Publish button will instead be a Finalize entries button - click it to see what entries you need to complete before you can publish.
Once a casebook is published, it is freely accessible to anyone with the link to the book, and it can be copied, modified and adapted by any accountholders. In addition, if you’re a Verified Professor, your published casebook will appear in search results on H2O and in Google.
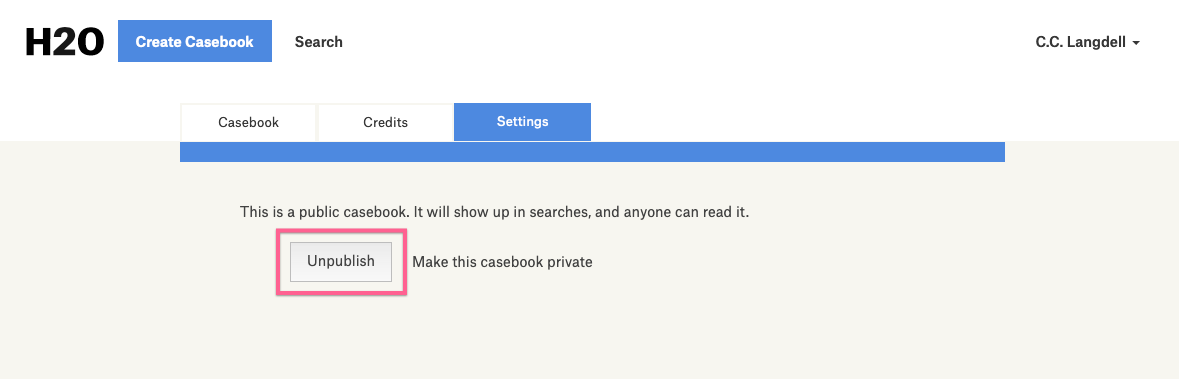
You can also “unpublish” a casebook. Go to the casebook and click the ‘Settings’ tab, and then click the ‘Unpublish’ button to remove it from public view. It then will be available on your dashboard as a private, editable casebook that you can later publish again if you wish.
Revising Casebooks
H2O enables authors to revise published casebooks at any time. While you’re working on a revised draft, your original published casebook remains publicly available. When you’re done making changes, you can publish your revised casebook, and it will replace the prior version.
Making changes
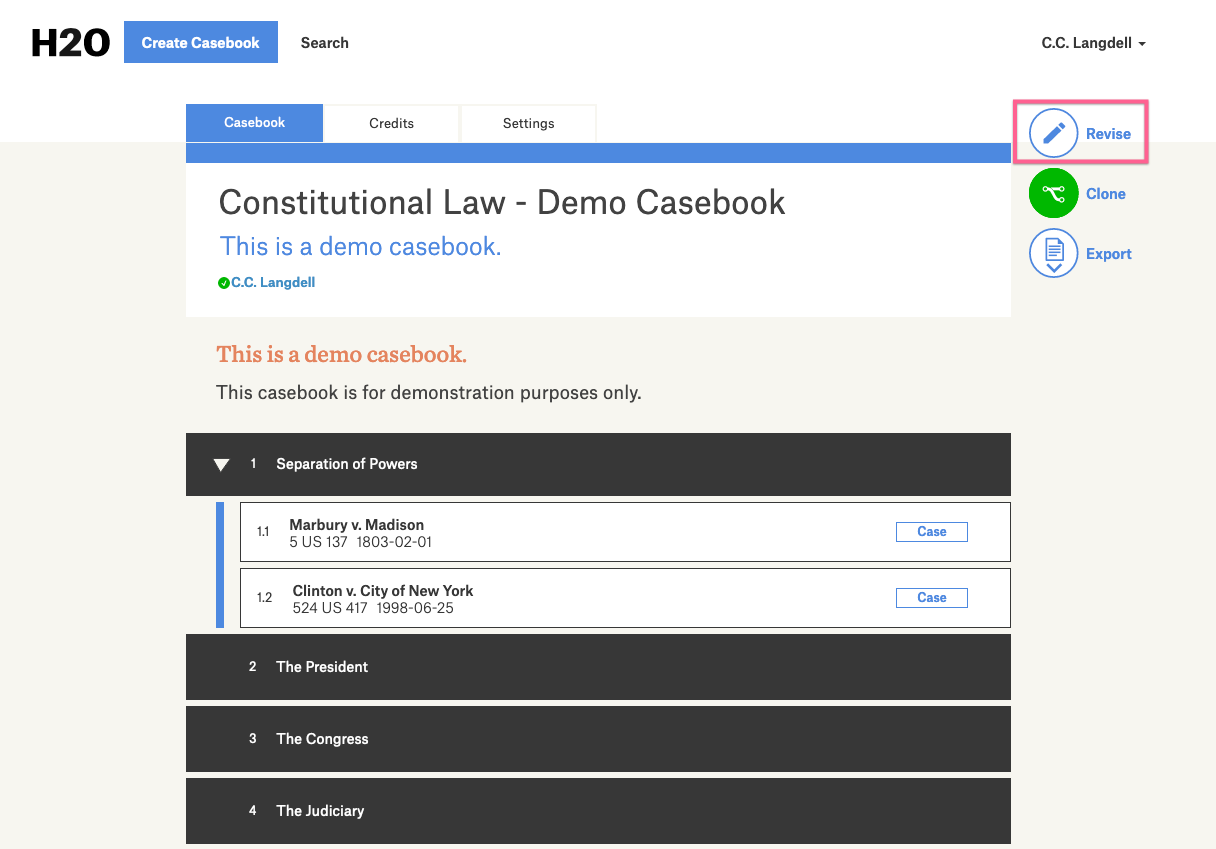
To revise a casebook, click the ‘Revise’ button to the right of the casebook contents:
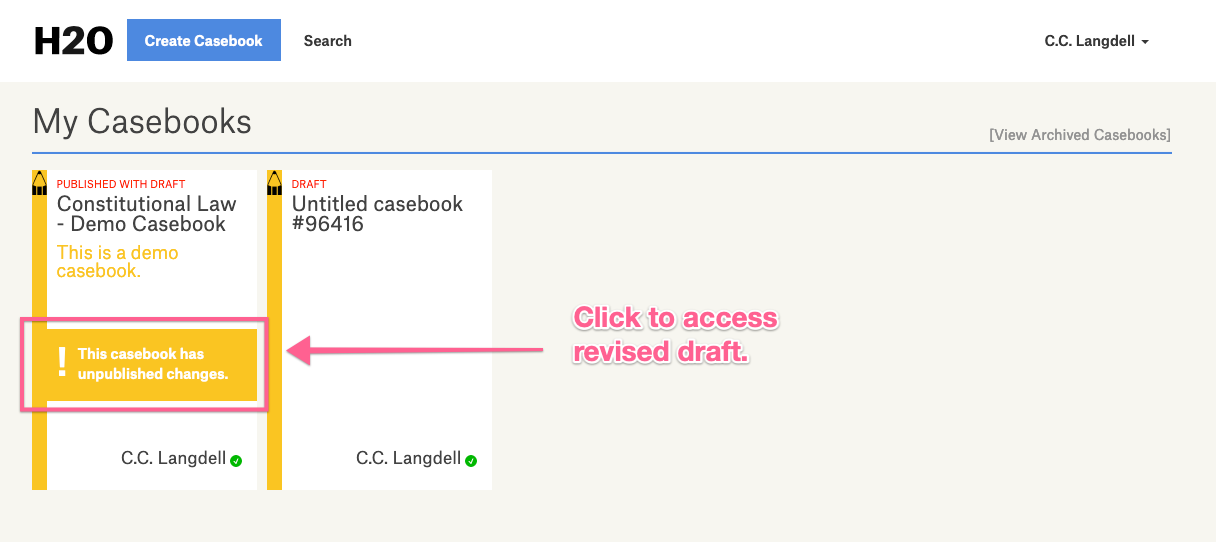
H2O will create a draft version of the published casebook, which you can modify however you like. Until you publish the revised version of your casebook, your working draft will appear in your dashboard as a yellow banner over the blue, published casebook. Click the yellow banner to access the draft, and click anywhere else on the casebook image to access the published version.
Publishing changes
When you’re done making changes, click the ‘Publish’ button, and H2O will substitute the new, revised version of your casebook for the prior version.
Please note that H2O currently does not maintain copies of prior versions of casebooks. If you want to ensure that an existing version is not replaced, then you should clone the published casebook and create a new casebook rather than revise the existing casebook.
Printing Casebooks
Watch our video tutorial on printing casebooks.
Any casebook on H2O can be exported to Word to be printed, converted to a PDF document, or published as a print-on-demand book. To export a casebook click the ‘Export’ button to the right of your casebook to begin the download to Word. Our exports are designed to be print ready, but we do apply Word styles automatically to make formatting your book fast and easy.
See the “Reading Casebooks” section of our help guides to learn more about how your students can access, read, and take notes on the digital version of their H2O casbeook.
Managing Casebooks
Grouping multiple editions
You can group multiple editions of the same casebook together to clean up your dashboard and direct readers to the most current one. Your dashboard has a Manage Casebooks link in the upper right corner.

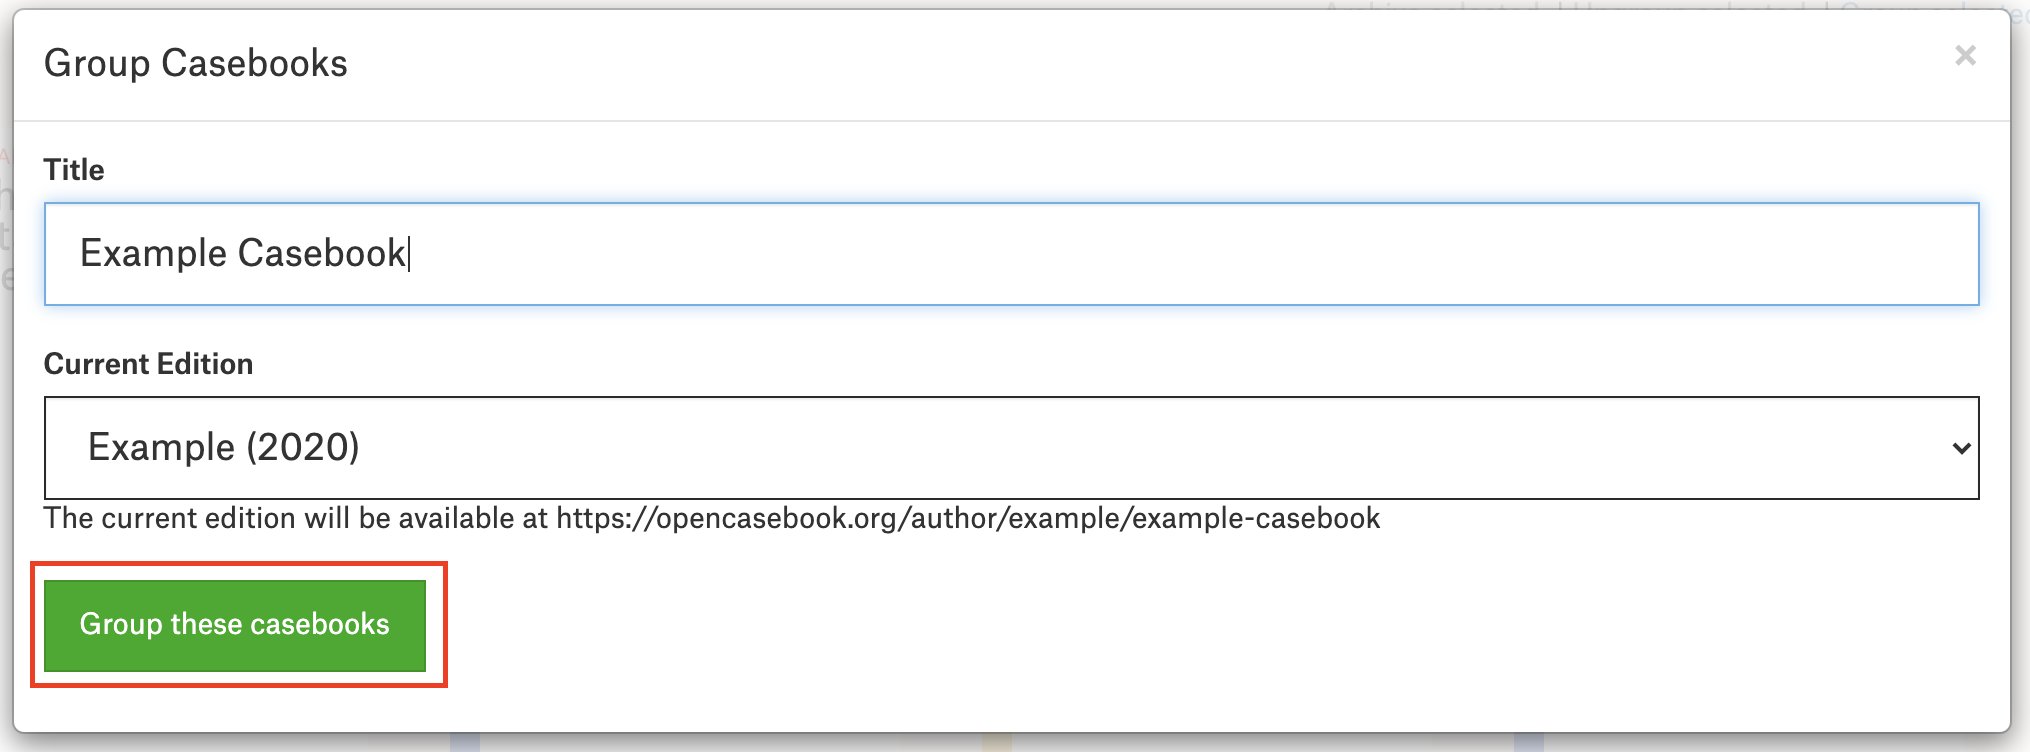
Clicking this will expose multiple options for managing your casebooks, and allow you to select casebooks by clicking on them. After you have selected all the editions of a casebook, click Group selected.

You’ll then be able to provide a title, select the current edition, and group the casebooks on your dashboard.
When a past edition of your casebook is viewed, a banner on top will alert viewers about the current edition.

Archiving casebooks
If you want to remove a casebook from your dashboard for any reason, you can archive it by clicking the ‘Settings’ tab and then clicking the ‘Archive’ button.
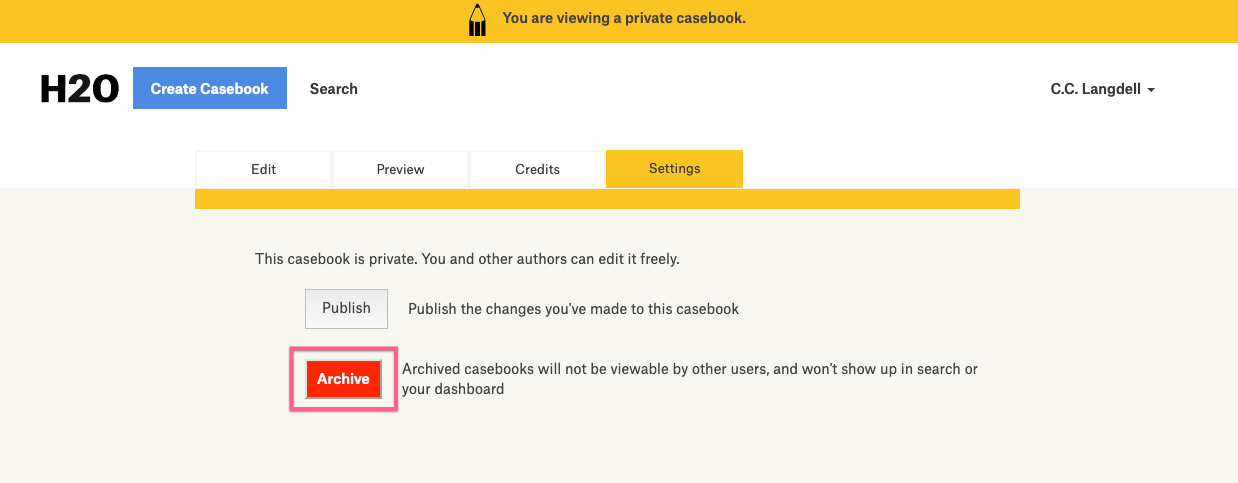
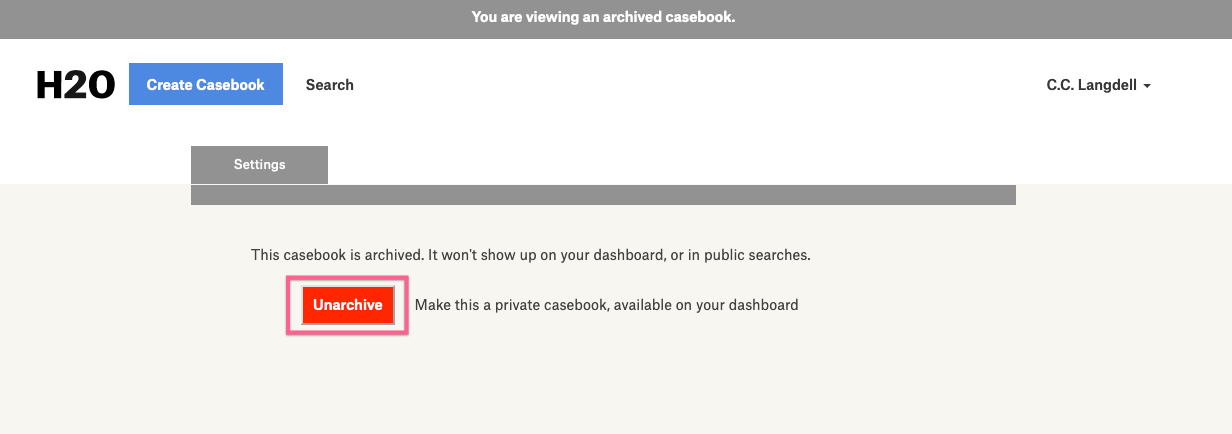
Archived casebooks are not deleted from the database, but they will no longer be accessible to the public or visible on your dashboard. To access your own archived casebooks, click ‘[View Archived Casebooks]’ on your dashboard.

If you’d like to restore an archived casebook, click the ‘Unarchive’ button on the ‘Settings’ tab of the archived casebook. This will return it to your dashboard, and you can continue working with it from there.
Copyright and H2O
All original content added to H2O by our authors is governed by our CC BY-NC-SA license, which encourages collaboration by allowing for unlimited non-commercial sharing and re-use of material with appropriate attribution.
Cases and other material in the public domain can be added to casebooks without restriction.
Copyrighted material must not be pasted into an H2O book unless an author determines that it meets fair use guidelines - it should instead be linked to on the web.
While fair use may cover some uses of the American Legal Institute's Model Codes and Restatements, H2O has a licensing agreement that allows authors to include the full text of ALI’s copyrighted materials, so long as those materials do not exceed 10% of a casebook.
For specific questions about copyright, your best source is a copyright expert at your institution who can provide you with guidance. For general questions about copyright and H2O, reach out to us at info@opencasebook.org.